Template:Sideicon
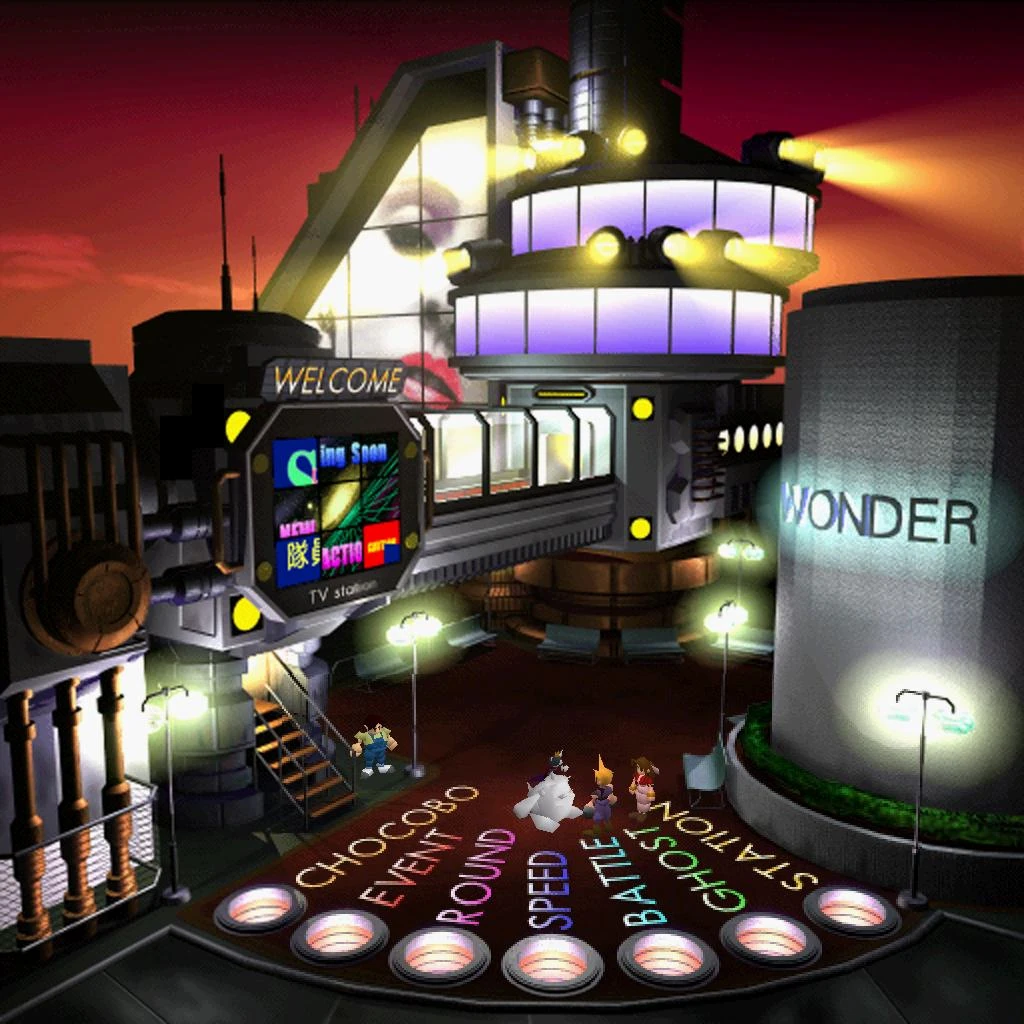
The Wonder Square.
The Wonder Square (ワンダースクェア, Wandaa Sukuea?) is a location in Final Fantasy VII, and part of the Gold Saucer. The Square houses a number of secrets for such a small area, and many of the minigames the player plays throughout the game can be replayed in Wonder Square for prizes and GP.
Story
Upon first time visiting the Wonder Square the party meets Cait Sith, and after a few failed attempts, he reads Cloud's fortune, foretelling that he will lose something he cherishes, but acquires what he seeks. Worried over this ominous prediction, Cait Sith forces Cloud to take him along. Later in the game, when Cait Sith steals the Keystone, a portion of the chase takes the party through the Wonder Square.
Locations
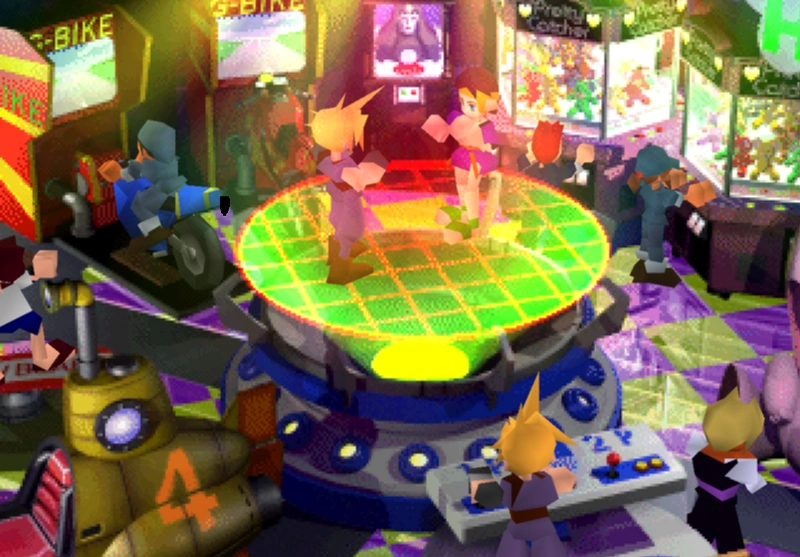
The Wonder Square is split into three areas. The first area is the main area and links to all of the other areas of the Gold Saucer. This area also contains the building which houses numerous attractions. The building has two floors and holds the Wonder Square's attractions. The building is accessed from a raised corridor entered from the entrance. The two floors are circular, but the floors are not aligned and the top-floor hangs over the edge of the first in an external view.
Entrance
The entrance area of the Wonder Square is a roofless and highly illuminated area, which casts an orange-red tint on the sky. The entrance uses chutes found at the bottom of the screen, labelled with the other Square names in various colors, to lead to the other areas of the Gold Saucer. The area uses a red carpet and a number of benches and street-style lamps border the floor. In the far background a screen showing a human face constantly appears.
The Wonder Square houses its main attraction in a building. The access to this building is up some stairs to the left of the entrance which uses a raised corridor to lead into the building. A constantly changing projection above the staircase made up of nine smaller screens in a three-by-three grid shows numerous advertisements.
This area is significant for the player as this is where Cait Sith is found. The player will encounter him as a fortune-teller. He will give a fortune to Cloud ("What you pursue will be yours. But you will lose something dear") and use the excuse of wanting to know how the fortune turns out as a reason to forcibly join the party.
This area can also briefly be revisited later after Cait Sith steals the Keystone in an optional storyline event. If the player chases Cait Sith he will enter the Wonder Square from the Speed Square. When the player enters the Wonder Square he will be hidden by a costumed-person, then move on into the Chocobo Square.
Building
- 1f.
Referred to as "Building 1f." (建物1F, Tatemono 1F?)" in the menu, features a platform in its center with minigames bordering the room. A set of stairs at the bottom of the area lead back out into the Wonder Square entrance. On the opposite side of the screen is a stairway upwards to the second floor of the building.
On the right-hand side of the room there is Basketball Game, a basketball throwing game. To the left-hand side there is Arm Wrestling where the player can have a virtual arm-wrestling match with a wrestler opponent or a sumo wrestler opponent. In the top-left of the room there are two Wonder Catcher machines. These machines give the player a chance of picking out prizes, however the mechanics are about chance.
On the left of the screen a female staff member will allow the player to trade earned GP for items. Some of the prizes are hidden and not revealed to the player until they are bought, some are available only after a specific point in the game, and some can only be bought once.
- 2f.
Referred to as "Building 2f." (建物2F, tatemono 2F?)" in the menu, the second floor of the building is another circular room filled with minigames. The crowdedness of the room can make it difficult to navigate.
A recurring theme in this room is minigames played previously in the story. Three of the five minigames available in the room are played as minigames as part of the story, however, they do not become available until after they have been played in the story. Due to this, only three of the five minigames are available on the first visit.
Most of the minigames in this room also do not take place in this field as such. The three minigames that are also tied with the storyline will take the player to a different screen (or module), while one is based in its own field area scenario.
In the center of the room is the 3D Battler minigame. This minigame is the only one that visibly takes place in the room. The minigame is accessed through the controls beneath the platform, and the game involves a rock-paper-scissors style system. Despite this, the game is largely down to chance as the system makes the opponents select their attacks in response to the player's, allowing opponents to be progressively more "challenging".
On the right of the screen is the Mog House minigame. This minigame is an interactive scene with the scenario of helping Mog find a mate.
To the left of the entrance is the G Bike minigame based on the Midgar Highway biking event, where the player must dispatch Shinra motorcyclists and preserve the truck.
To the right of the entrance is the Snow Game minigame based on the Icicle Area event where the player snowboards from the Icicle Inn into the Great Glacier. The Snow Game minigame does not become available until Cloud returns to the party after the Mideel events.
Below the Snow Game minigame on the screen is the Submarine Game minigame. The minigame is based on the Junon Underwater Reactor Shinra Sub Huge Materia event. The minigame does not become accessible here until after the storyline event has occurred.
At the top of the screen, to the right of the G Bike minigame, is the Fortune Telling, which is not a minigame as such, as it will always give the same answer based on the player's position in the story and only offers mild hints. The fortune constantly changes throughout Disc 1 but gives the same fortune for the rest of the game from then on.
Games
The arcade in the Wonder Square houses many minigames that can be unlocked during the course of the game. Once the player has played the minigame in the storyline, they can return to the Wonder Square and replay it.
Arm Wrestling

Arm urestling minigame.
Arm Wrestling (アームレスリング メガずもう, armuresuringu megasumoo?). Cloud must tap Template:PS O symbol (PlayStation) or [OK] (PC) rapidly to beat the virtual opponent to win 2 GP for beating the Wrestler and 1 GP for beating the Sumo Wrestler. The game costs 100 gil to play and is located on the second floor.
Basketball Game
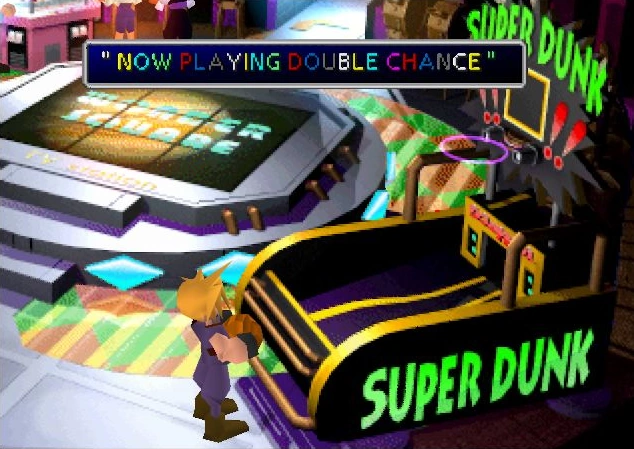
Now playing Double Chance.
Basketball Game (バスケットゲーム, basukettogeimu?), referred to as "Super Dunk" on the machine. The player must hold Template:PS O symbol to charge, and release the button to throw a basketball. If the player misses, they get nothing, if they win they can try again. Once they miss, the player receives 1 GP for every successful hit. Every 10 hits, the player is allowed to take a chance on an 11th shot to double their GP, but if they miss they win nothing.
If the player can successfully get 44 consecutive hits, they can win 300 GP. A timing of .45 seconds will work every time, but there is a small randomized distance factor added to each throw, so the player must be precise. The time to release the button is the exact moment Cloud stops moving, best spotted when the ball touches Cloud's hair. There are two ways to hit the basket: either as a direct hit, or bouncing the ball off the panel. Basketball Game is a good way to earn plenty of GP before chocobo racing becomes available. The game costs 200 gil to play and is located on the first floor.
Wonder Catcher
Wonder Catcher (ワンダーキャッチャー, wandaakyatchaa?), referred to as "Proxy Catcher" on the machine. There are two crane games that can potentially reward the player with rare items. The game costs 100 gil for either machine. The left and right machines have different prizes. Due to a programming error, when the player wins an Ether the game will display the win as a Phoenix Down, and vice-versa. The game is located on the first floor.
Left Machine
|
Right Machine
|
G Bike
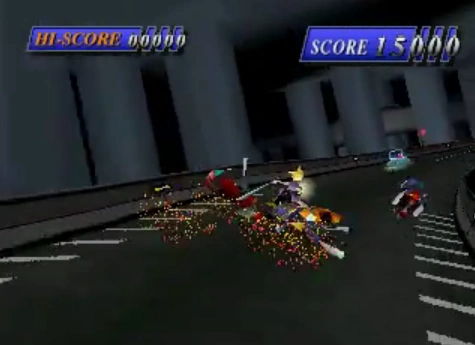

G Bike minigame.
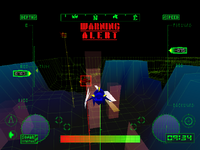
G Bike (Gバイク, G Baiku?), referred to as "G-Bike" on the machine. Based on the motorcycle minigame played on Midgar Highway, the player rides behind a truck and must attack enemies to keep them from ramming the truck — Template:PS O symbol attacks right and Template:PS Square symbol attacks left. The player can also attack enemies by ramming into them. The player earns 500 points for killing enemies and loses 50 points every time the truck is hit.
There are two types of bikers whose AI differs slightly: orange and red bikers. The orange bikers immediately attack the truck and the red bikers try to drive the player away from the car. The best strategy is to quickly dispatch bikers as they appear on the screen and to go for a domino effect when a group of bikers draws close.
The player wins 2 GP for any score above 5000, but if they score 10,000 points or more they win 10 GP, and the first time they get 10,000 points they also win a Speed Source. The game costs 200 gil to play and is located on the second floor.
Square Enix will bring the G Bike game to mobile platforms in autumn 2014. Developed in conjunction with CyberConnect2, the player will be able to jump and slide and customize their bike with Materia. The G Bike will be available on iOS and Android platforms, and will likely include microtransactions.[1]
Fortune Telling
Fortune Telling (うらない, Uranai?), referred to as "Crystal Fortune" on the machine. The fortune teller has no prizes and only dispenses vague hints on what will happen next in the story/where to go next. However, it only works on Disc 1, on Disc 2/3 it only says "never give up hope". It costs 50 gil to play and is located on the second floor.
| Point in game | Fortune |
|---|---|
| First visit | Use caution in relationships. |
| After obtaining buggy | Your lucky color is red. |
| After Cosmo Canyon | You may meet someone new. |
| After Nibelheim | You have ties with those that fly. |
| After obtaining Tiny Bronco | What you are looking for is near. |
| After obtaining Keystone | Use caution in relationships. |
| After the Gold Saucer date | What you search for is in the Southeast. |
| After Temple of the Ancients | Beware of the north. |
| After Forgotten Capital | A great turning point is near. |
| After obtaining Highwind | Never give up. |
Mog House
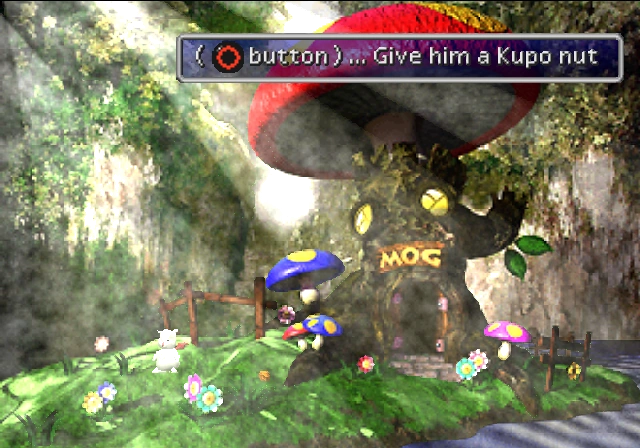
Mog House.
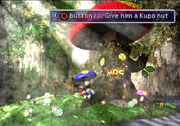
Mog House (モグ・はうす, Mogu Hausu?). Not so much as game as it is a scene, the game introduces a Mog (named Mog) who is at the age when he should be looking for a mate, and he is learning to fly to impress the female Mogs. The player must feed Mog five Kupo Nuts so he can learn to fly, but if he is overfed he'll fail. Mog will make a squeaking sound different than the sounds he made before when he has had the right number of Kupo Nuts.
Once he learns to fly, Mog meets a female named Mag. The player must feed him three Kupo Nuts so he can fly and impress her. Afterward, the two have many little Mog children. Although the game itself offers no reward, the first time the player completes the game the man in front of the game gives the player 30 GP. Mog House costs 100 gil to play and is located on the second floor.
3D Battler

3D Battler.
3D Battler (3Dバトラー, 3D batoraa?). A "rock-paper-scissors" type game, the player faces five opponents. Template:PS X symbol is a low attack, Template:PS Square symbol is a middle attack, and Template:PS Triangle symbol is a high attack. High attack beat low attacks, middle attacks beat high attacks, and low attacks beat middle attacks. Two attacks of the same type cancel each other out.
The more opponents the player beats, the more GP they win. They win 3 GP for beating the 2nd opponent, 30 for beating the 3rd, and 300 GP for beating four opponents. The final opponent, who is an invisible fighter, is not intended to be able to be beaten. If the player were to defeat the fifth and final opponent, it would only lead to the player stand on the platform, stuck, with no opponent to encounter, so no prize for doing so exists. The game costs 200 gil to play.
| Round | Mechanics per hit | Chance of beating | Cumulative chance | Prize | Image |
|---|---|---|---|---|---|
| First | 50% win, 25% loss, 25% tied | 93.5234% | 93.5234% | No prize | |
| Second | 33.3% win, 33.3% loss, 33.3% tied | 50% | 47% | 3 GP | |
| Third | 25% win, 50% loss, 25% tied | 6.4766% | 3% | 30 GP | |
| Fourth | 25% win, 75% loss, 0% tied | 0.08903% | 0.0003% | 300 GP | |
| Fifth | 0% win, 75% loss, 25% tied | 0% | 0% | No prize |
The cumulative chance to win against the opponents' moves gives an idea how difficult it is to beat the 3D Battler: the player has a 1/3700 chance to make it to the fifth opponent, which cannot be defeated. Losing the fifth battle still gives the prize for winning the fourth battle: 300 GP.
Snow Game


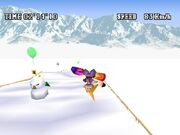
Cloud snowboarding.
Snow Game (スノーゲーム, sunoogeimu?). The replay of the Snow Game minigame at Icicle Inn, located on the second floor of the Wonder Square, lets the player ride one of three courses, collecting balloons and avoiding obstacles. It costs 200 gil to play any of the three courses. The game is available after Gold Saucer reopens on disc 2.
Template:PS X symbol is jump and Template:PS Square symbol/Template:PS down is brake. Template:PS L1 button and Template:PS L2 button make the snowboarder edge their snowboard, taking turns much faster than pressing Template:PS left or right. Template:PS Start button pauses the game and opens the menu, and also skips the intro.
This minigame has also appeared as a stand-alone game Final Fantasy VII: Snowboarding released for mobile phones in North America in 2005, and in Japan three years later in 2008.
Mechanics and prizes

The player jumping.
At the end of the course, the player is rated on how many balloons they got, how long they took and how many obstacles they hit. The three categories add up for an overall score of 100 points, with Technique and Time both worth 30 points each, while Balloons are 40 of the total. Technique points can't be earned, but points are deducted whenever the player hits anything. Time points work the same and points are deducted for every 2 seconds slower the player is than the target time (1:30 for course A, 1:45 for course B and 2:00 for course C). Red balloons give 1 point each, blue 3 points each, and green give 5 points a piece.
At the end the player is given a rank based on their score.
- Bad - 0-29*in the PC-version Bad and Awful are swapped
- Awful - 30-69*in the PC-version Bad and Awful are swapped
- Good - 70-99
- Cool - 100 points
Scoring 70+ on the A (Beginner) Course opens the B (Expert) Course, and 70+ points on the B Course opens up the C (Crazy) Course. For a score of 90+ points, the player wins some GP and a one-time prize.
- A Course - 30 GP, Safety Bit
- B Course - 100 GP, All Materia
- C Course - 300 GP, Crystal Bangle.
Unlike the other minigames, snowboarding can be played by characters other than Cloud. Every so often (37.5% chance), Tifa or Cid will ask to play if they are. Using them is completely optional, and has no effect on the game in any important fashion. If both characters are in the party, Tifa will always be the one asking to play.
Time Attack
Getting a "Good" score on all three opens the Time Attack mode for the player to race against their best time; a yellow balloon will appear at the start of each track to activate the mode. As long as the player stays on the snowboarding game a ghost Mog of the player's best time will race along with Cloud. Pressing the pause button opens an options menu to change the floor to a checkered grid, as well as allowing to choose whether the Mog should ride a snowboard or a sleigh. Achieving a rank of "Good" on a track will make a silver balloon appear that grants a speed up, while getting a rank of "Super" will unlock the option to have a running Cactuar replace the ghost Mog (listed as ? ? ? in the menu).
The Japanese versions have certain differences to the other releases. The ghost Cactuar, or the option to change the terrain into a checkered one, are not available in the original Japanese version, but has been added in the International version. In the original Japanese version, when toggling the cursor between the Mog on a snowboard and the Mog on a sleigh (without picking one), the figure on the screen does not change until the player picks one. In later versions the figure changes in real-time. The original Japanese version uses an incorrect Japanese symbol for getting 100 points on Course B; the symbol for the "Freak" rating in Time Attack is displayed, instead of the standard "Cool" rating.
| North American NTSC version | |||
|---|---|---|---|
| Rank | Course A | Course B | Course C |
| Fail | 01'30"000 or above | 02'00"000 or above | 02'10"000 or above |
| Poor | 01'16"000 - 01'29"999 | 01'40"000 - 01'59"999 | 01'50"000 - 02'09"999 |
| Average | 01'05"000 - 01'15"999 | 01'20"000 - 01'39"999 | 01'35"000 - 01'49"999 |
| Good | 01'00"000 - 01'04"999 | 01'16"000 - 01'19"999 | 01'25"000 - 01'34"999 |
| Very Good | 00'56"000 - 00'59"999 | 01'13"000 - 01'15"999 | 01'20"000 - 01'24"999 |
| Excellent | 00'54"000 - 00'55"999 | 01'10"000 - 01'12"999 | 01'15"000 - 01'19"999 |
| Super | 00'52"000 - 00'53"999 | 01'06"000 - 01'09"999 | 01'10"000 - 01'14"999 |
| Freak | 00'51"999 and below | 01'05"999 and below | 01'09"999 and below |
| PAL-version | |||
|---|---|---|---|
| Rank | Course A | Course B | Course C |
| Fail | 01'45"000 or above | 02'15"000 or above | 02'30"000 or above |
| Poor | 01'30"000 - 01'44"999 | 02'00"000 - 02'14"999 | 02'10"000 - 02'29"999 |
| Average | 01'18"000 - 01'29"999 | 01'45"000 - 01'59"999 | 01'54"000 - 02'09"999 |
| Good | 01'12"000 - 01'17"999 | 01'31"000 - 01'44"999 | 01'42"000 - 01'53"999 |
| Very Good | 01'07"000 - 01'11"999 | 01'29"000 - 01'30"999 | 01'36"000 - 01'41"999 |
| Excellent | 01'05"000 - 01'06"999 | 01'27"000 - 01'28"999 | 01'30"000 - 01'35"999 |
| Super | 01'02"000 - 01'04"999 | 01'19"000 - 01'26"999 | 01'24"000 - 01'29"99 |
| Freak | 01'01"999 and below | 01'18"999 and below | 01'23"999 and below |
| Original and International Japanese NTSC versions | |||
|---|---|---|---|
| Rank | Course A | Course B | Course C |
| Fail | 01'30"000 or above | 02'00"000 or above | 02'10"000 or above |
| Poor | 01'15"000 - 01'29"999 | 01'40"000 - 01'59"999 | 01'50"000 - 02'09"999 |
| Average | 01'05"000 - 01'14"999 | 01'20"000 - 01'39"999 | 01'35"000 - 01'49"999 |
| Good | 01'00"000 - 01'04"999 | 01'15"000 - 01'19"999 | 01'25"000 - 01'34"999 |
| Very Good | 00'55"000 - 00'59"999 | 01'12"000 - 01'14"999 | 01'21"000 - 01'24"999 |
| Excellent | 00'54"000 - 00'54"999 | 01'10"000 - 01'11"999 | 01'17"000 - 01'20"999 |
| Super | 00'53"000 - 00'53"999 | 01'08"000 - 01'09"999 | 01'15"000 - 01'16"999 |
| Godly*The Japanese versions have an additional rank that was removed in all other versions. | 00'52"000 - 00'52"999 | 01'06"000 - 01'07"999 | 01'13"000 - 01'14"999 |
| Freak | 00'51"999 and below | 01'05"999 and below | 01'12"999 and below |
| PC version | |||
|---|---|---|---|
| Rank | Course A | Course B | Course C |
| Fail | 01'30"000 or above | 02'00"000 or above | 02'10"000 or above |
| Poor | 01'15"000 - 01'29"999 | 01'40"000 - 01'59"999 | 01'50"000 - 02'09"999 |
| Average | 01'05"000 - 01'14"999 | 01'20"000 - 01'39"999 | 01'35"000 - 01'49"999 |
| Good | 01'00"000 - 01'04"999 | 01'15"000 - 01'19"999 | 01'25"000 - 01'34"999 |
| Very Good | 00'55"000 - 00'59"999 | 01'12"000 - 01'14"999 | 01'21"000 - 01'24"999 |
| Excellent | 00'54"000 - 00'54"999 | 01'10"000 - 01'11"999 | 01'17"000 - 01'20"999 |
| Super | 00'53"000 - 00'53"999 | 01'08"000 - 01'09"999 | 01'15"000 - 01'16"999 |
| Freak | 00'52"999 and below | 01'07"999 and below | 01'14"999 and below |
Submarine Game
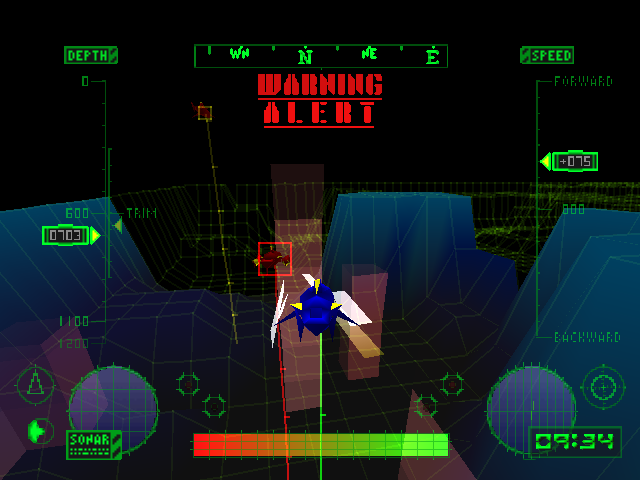
Submarine Game combat screen.
Submarine Game (潜水艦ゲーム, sensuikan geimu?). Referred to as "Torpedo Attack" on the machine. A replay of the battle for the Huge Materia near the Junon Underwater Reactor becomes available on disc 2 after it has been played in the storyline. The player must shoot down a number of enemy submarines. Template:PS up is descend, Template:PS down is ascend, Template:PS left or right is move left or right, Template:PS X symbol is slow down, Template:PS Triangle symbol is speed up, Template:PS Square symbol is fire, Template:PS R1 button is sonar, Template:PS R2 button is change view and Template:PS Select button is quit.
The number of enemies submarines and their HP increases by each difficulty level, as does the number of mines on the field, up to level 5. The best strategy is to use sonar to locate nearby enemy subs, go behind them and fire torpedoes all at once after locking on target. For winning, the player gets 20 GP, plus a one-time special item. The score doesn't influence the received prize, but the faster a level is beaten the higher the player's score will be, and the less damage the player takes. Higher difficulties will net more points than lower difficulties.
The game is located on the second floor.
| Difficulty | Prize | Number of targets |
|---|---|---|
| Level 1 | 20 GP + Ink | 7 |
| Level 2 | 20 GP + T/S Bomb | 10 |
| Level 3 | 20 GP + Dragon Fang | 8 |
| Level 4 | 20 GP + Dragon Scales | 12 |
| Level 5 | 20 GP + Cauldron | 10 |
Trading GP for items
The attendant at the entrance to the arcade will allow the player to trade in GP for items. The items for trade are as follows:
| Name | Cost |
|---|---|
| Potion | 1 GP |
| Ether | 20 GP |
| X-Potion | 80 GP |
| Turbo Ether | 100 GP |
| Gold Ticket | 300 GP |
| Carob Nut | 500 GP |
| Gil Plus Materia* | 1,000 GP |
| EXP Plus Materia* | 2,000 GP |
*Only one available, only available after Gold Saucer reopens on Disc 2.
Gallery
Template:Gallery
Musical Themes
Template:Listen
"Cait Sith's Theme" (ケット・シーのテーマ, Ketto Shī no Tēma?) plays outside the Wonder Square, when the party first meets the character. In subsequent visits, the track "Gold Saucer" (ゴールドソーサー, Gōrudo Sōsā?) plays outside and inside the area.
Trivia
Cosmo Canyon appears on the screen.
- The screen on the Wonder Square entrance displays various scenes. One of the scenes is actually an unused concept art for Cosmo Canyon.
References
Template:FFVII Template:Minigames