I'm one of those people that as soon as they love a track, it's put on repeat until my brain is over-saturated. Luckily, this time, I can blame this self-torture on someone else entirely. I blame Faethin for showing me the magic that is Distant Worlds, so I'll share it with you lot. Normally, I'm quick to steer clear of anything XI-related (MMORG really not my style. So yeah, I'm super chuffed XIV is headed in the same direction), but this is like... I don't even know. Epic. Know that I'm writing Part 15 of Paramina's Final Fantasy XII Walkthrough whilst listening to it... playcount stands at 82 having downloaded it yesterday evening.
The Henne Mines[]
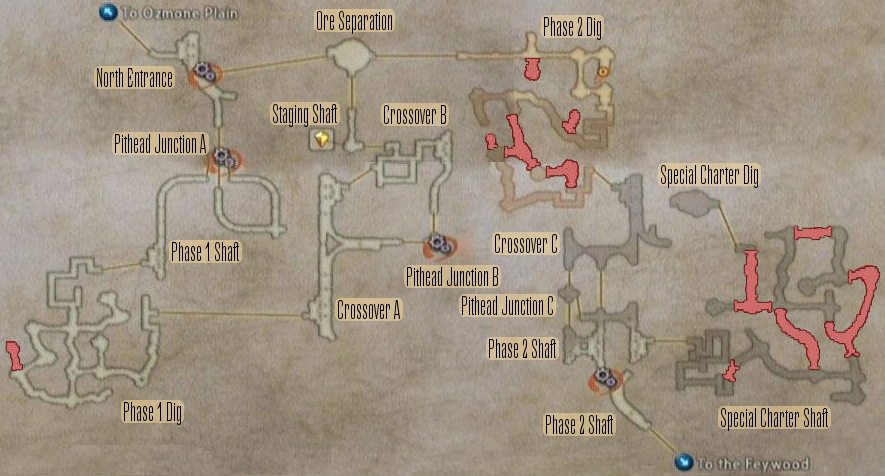
If you don't have a map yet, refer to this one. Pretty sure it's ripped from the Brady Games guide thing (the one I left on a plane), so it's reliable enough. I think it may be missing a couple of transition lines though.
The mines are meant to appear as a sort of Maze-Like structure thing, but to be honest, as long as you follow this, you won't have any problems. The whole premise of traverse in this place is the operation of blue and red switches, and since you should know by now I love any excuse to appropriately colour my text with relevance, I'll take this opportunity to tell you every single switch you need to press, to what colour (oh yeah) and when.
You start in the North Entrance, so follow this path down South until you reach a blue switchboard. Hit ![]() to change it to red. This will open the gate just in front of you, allowing access to Pithead Junction A. Head on in to find a Wounded Soldier on the ground. Engage him in some witty chat for him to be the latest to jump on the bandwagon and try and stave us off the Mines. Too late, bro, too late. Hit the Gate Switchboard nearby to change the glow from red to blue. Oh noez! Flanbush!
to change it to red. This will open the gate just in front of you, allowing access to Pithead Junction A. Head on in to find a Wounded Soldier on the ground. Engage him in some witty chat for him to be the latest to jump on the bandwagon and try and stave us off the Mines. Too late, bro, too late. Hit the Gate Switchboard nearby to change the glow from red to blue. Oh noez! Flanbush!
Luckily, this is the weaker of the two Flanbushes. And technically, they're not Flanbushes, because the monsters that drop are actually Jellies, but 'Jelly' was way trickier to make an amalgamation with, so Flanbush is staying. The first wave will bring three Jellies to fight. Like Flans, they're weak to Fire, so throw out Fira to deal damage to all three. You might want to assign this job to Balthier, considering this bullets are pretty crap against these guys. There's another wave of three to kill after you dispatch the first group. I know a few... strategists (?) say use a Quickening to get rid of these guys, but trust me - don't. Not yet anyway. There's a much tougher Flanbush coming up and you'll need it for then, which I doubt you can recharge all your MP in the meantime.
With the Jellies slaughtered, exit South and follow the path around to find the Map Urn, meaning you won't have to keep referring to the map on your left anymore (Huzzah?). Of course, the Henne have to send another Welcoming Committee our way in the form of a Bat Ambush (...Batbush?). There's no way this is as tricky as the Flanbush, considering it's just made up of Redmaws and Seekers. Just adopt your basic attack pattern with this fight and it'll be over in no time. Once you've cleared the group out, keep following the path around to return back to Pithead Junction A.
At Pithead, hit the switch again from blue to red, thus opening the gate to the West. Follow Phase 1 Shaft down. It's an easy path and only presents a Bat group as enemies, so you shouldn't be in too much trouble here. If you are, I'd say you're maybe a bit underlevelled for this area. Hey, that's what fleeing does to you! Oh, and by the way, in case I didn't make this clear - the shame is back. Seriously, kids, don't do drugs.
Exit West to the Phase 1 Dig. This is where the Treasure Chests start popping up. Almost all of them are on your basic path anyway, so if you're lucky you should manage to stumble across all 10. The best on offer are Gillie Boots, Musk Stick, Shielded Armor and some decent Gambits. However, the best treasure is a Golden Amulet, which doubles your LP earned, making License Board travelling twice as easy. A true plunderers dream, this little gem can be found in Treasure Chest 10 (on the Brady map to the left), however, it's got a less than 50% chance of showing up, so cross your fingers. There are some Nightmares patrolling this Dig, so keep wary. Once you've truly scoured the area for all treasure, head North and exit to Crossover A.
I must break this text up... I'll pretend I've written a meaningful title and you'll pretend you nodded sagely at it[]
Barely relevant, I know, I know.
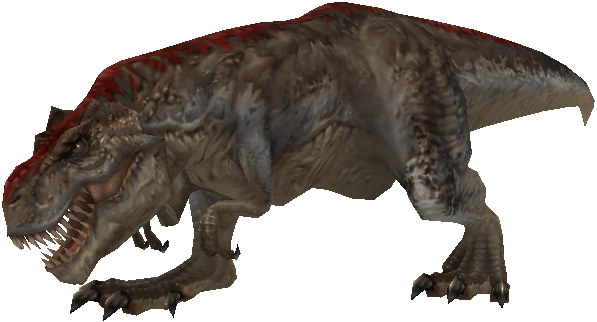
Okay, so we're trying to get to the Staging Shaft, but here's where our Gate switching gets a little more complicated. Head North up Crossover A until you see a giant Dinosaur. I'm sorry, but, Square, what the hell? What on earth is this thing doing down here? Talk about random foe placement, how did it even fit in? Anyway, the Tyranorox is weak to Wind, so exploit that if you wish. To be honest, I'd just Protect your Tank and have him go in there, blades at the ready. You could even, now that I think about it, attempt a Berserk on your Tank in order to increase speed and attack power whilst your other two pitch in with ranged shots and curatives every now and then. This'll work well especially if you've given Basch an Axe, considering this thing - more often than not - really throws out hard damage. With this creature fallen, follow the path North and exit at Crossover B. In Crossover B, take the path around the top through the blue gate, following this up North and then down South. Uh... that's it. Exit down-stage.
We're now in Pithead Junction B. Remember what happened when we were in Pithead Junction A? This should serve as a swift warning for you. Heal up with Potions (you'll need your MP) and set up your buffs if you need them. Hit the switch from red to blue. Flanbush!
This Flanbush is much harder than the last one. Hypothetically speaking, you could Flee out of there as soon as the first eight (yeah, eight) drop from the ceiling. Of course, you will have then shamed yourself, your parents and - why the hell not? - your entire village. If you want to be a man and tough it out, you can either Summon (!) Belias for some heavy Fire damage or whip out a Quickening Chain. I can't even remember how many waves of eight there are at this point, so basically fight until you want to leave. You get good EXP, LP and Loot to sell on, so take advantage of this if you think you're levelled enough. Alternatively, you can kill one wave, exit two screens, and keep flipping the switch to get a decent chain. However, this method is for the strange players who for a reason I cannot fathom, insist on mindless hardcore grinding at stages in the game like these, thus making them severely overpowered for the rest of the game and ruining the fun. Losers.

You will... be here shortly (...)
Exit West back into Crossover A, head North (you'll have to fight another Tyranorox, since you've exited two screens) and transition to Crossover B again. This time, take the path South around, and with the red gates now open, you can exit North to the Staging Shaft.
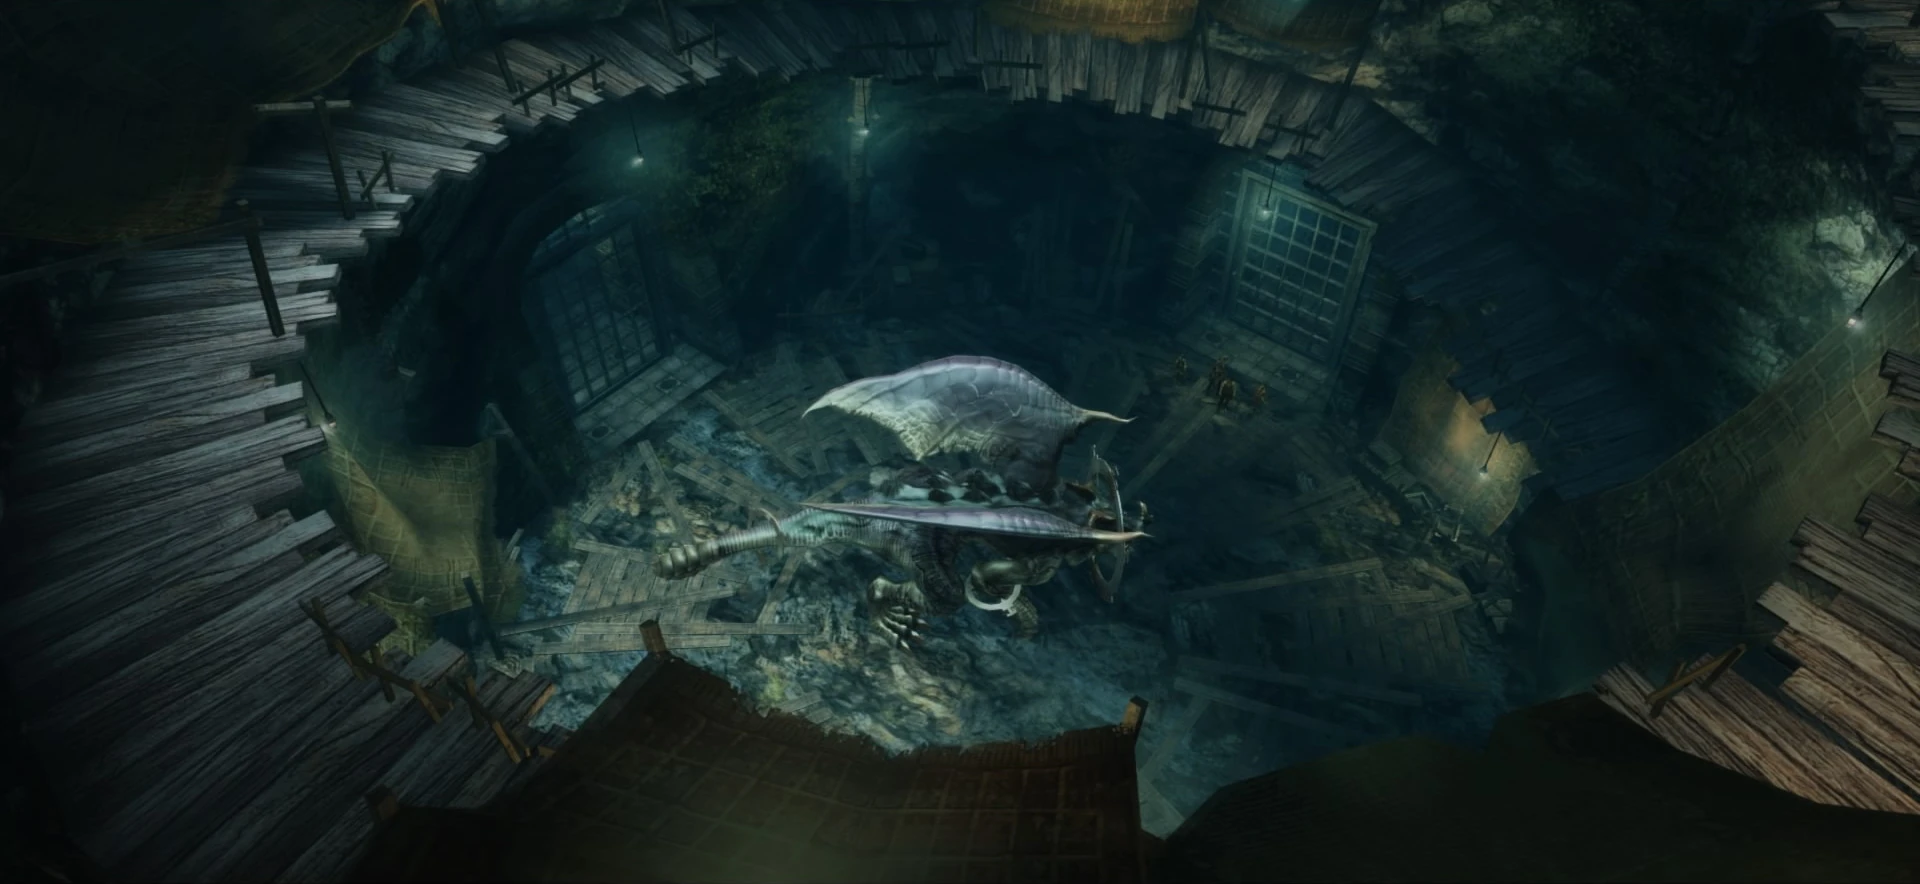
As our party enter (Larsa musing over his giant brain and his seemingly infinite knowledge re:Draklor and Magicite), we're told the Draklor researchers must be in the Henne to find a new source of Magicite! ... Okay, so it took them this entire, potentially killer, trek to learn that? Couldn't they have put two and two together and surmised that since Henne Mines was a Magicite Mine, the Empire were likely looking for Magicite at the entrance? I mean, I love this party, but I'm beginning to think Vaan's chronic stupidity is perhaps contagious. However, our party haven't got long to muse on this new (...) realization, since Mjrn stumbles on scene. And man, is she wasted. I'm pretty sure had we searched in the Sandsea ten minutes ago, we'd have found her slumped over the bar. She stumbles around like a drunken Uncle at a wedding, whilst Ashe - naïve, naïve, Ashe - wonders what's wrong. In true drunkard fashion, Mjrn immediately turns on her accuser and calls Ashe a "power-hungry Hume." Heh, this is awkward now. Luckily, Mjrn staggers off scene, saving us any other embarrassing, paranoid drunken ramblings. We're left in the clearing with a Teleport Crystal. Save up, then cast Protect, Shell, and things like Regen around your party. Quickly touch the Save Crystal again to replenish your MP, then leg it North, following Mjrn...
| Boss Battle: Tiamat |
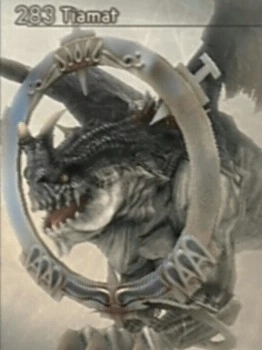 Level: 25 This one is pretty tough. Before I even start the strategy, you need to get a couple of hits in there, because Tiamat has an Attack Bonus when he's got full HP. Not your amigo. You'll also want to try and equip Black Belts because Tiamat also likes to use Disablega, which is a real slap in the face you can't do much about when you're hit. One of your main priorities in this fight is to have a Mage keep a constant eye on Larsa's HP. Larsa, the child of the infinite Hi-Potions, is a great aid in terms of healing, and he does decent physicals, too, so don't let the kid KO. Tiamat tends to constantly target whoever's nearest, which is why you should send your Tank in fully buffed out. Since the majority of Tiamat's attacks are physical, use Protect to take the edge of them, and Regen (if possible) to keep their HP up. With this strategy, you should have your Ranged fighters supporting with both curatives and occasional physicals when they have the chance. This also keeps two out of four of your party out of the dreaded Disablega range. In terms of healing, opt for Curaga over Cura, since Tiamat does a lot of damage, and soon with Cura, you'll be chasing to keep up with his hits. In the last leg of the battle, Tiamat has a massive defense boost, making your physicals pretty moot. In response, I recommend throwing out a Quickening Chain to get some good damage in. Getting a decent chain to end with a Concurrence will help even more. If you're lucky, this'll eat the last of Tiamat's HP. If not, revert to Hi-Potions for your curing, and Berserk your Tank to do a little extra damage to chip the last of the HP off. A lot of other people suggest using a Quickening at the start of the battle, but this will wipe your MP and render your Mages useless. Trust me, save it until last - it won't hinder your chain, you can do Mist Charges. You'll need the MP in the battle for your curatives. |
Oh! That was a tough one, no? With Tiamat fallen, Mjrn the Drunkard slowly wanders back on screen. She drops a shard of Nethicite, which shatters at her feet, before a spectral figure suddenly appears (suggesting Mjrn was possessed, not inebriated), disappearing just as quickly. Mjrn collapses and Fran grabs her little sister. Mjrn explains that she wasn't wasted, but totally crazy on Mist (eh, each man chooses their poison). She had travelled to the Mines after the Empire had visited the Woods and made her feel uneasy. Following her instinct, she reached the Henne only to be imprisoned and locked up beside a shard of Nethicite. Essentially, she was then fashioned into a loco time-bomb, waiting for the Mist to drive her nuts. Larsa quickly retracts his gift from... what's-her-face. Pen... dant? I forgot she was still here. She pipes up to remind me of her existence but her vague words have gone over my head yet again and I'm unsure what exactly she contributed to this scene.
Our party are miraculously transported back to Eruyt. Xenophobic, bitch Priestess Jote quickly gives Vaan Lente's Tear, allowing us passage through Golmore, and tries to shoo him off quickly (don't blame her, to be honest. She probably doesn't want her village stinking of peasant). However, Mjrn is indignant. How can the Viera just sit by and watch Ivalice change? Pretty easily, apparently, and scantily clad, too. Mjrn tries to leave the Wood, but our party is burgeoning as it is, so Fran is quick to change her sister's mind. Jote and Fran have a rather sororal moment, in which Fran expresses her worry of abandoning the Wood. Darling, you may have abandoned the Wood, but in exchange you got Balthier. Surely this is an awesome bargain you should be cheesing about every day? Who would choose an expanse of tree over a Pirate in leather trousers? Tell me who, Fran, tell me who.
→ Someone spilt the MiracleGro again, didn't they?
← "Just a mean, green mother, from Outer Space..."
← Home