Part 7- On the Side FlamesofRebirth
Completely Random Introductory Quote-
Power is not a means; it is an end. One does not establish a dictatorship in order to safeguard a revolution; one makes the revolution in order to establish the dictatorship. The object of persecution is persecution. The object of torture is torture. The object of power is power.
George Orwell, Nineteen Eighty-Four
Now it’s on for realz, yo
We have reached a major turning point, both in terms of the plot and game play. Up to now, all the battles have been easy, no real strategy required. The story line bosses will still be simple, but if you choose to take on the optional hunts without leveling up first, you can’t fake your way through it anymore. Preparation and skill and maybe some luck will be needed, and we’ll be spending more time on side quests than the main story.
Side questin’ time
Ktjn
Back in Rabanastre, it’s time to be a dick to Ktjn again. I feel like such a douche bag doing this to her, and even more so for telling you to do it to her too, but it all works out in the end. Dash her dreams by telling her “it’ll never happen.” You asshole. Swing by the clan hall for some rewards and a new hunt, the Gil Snapper. If you haven’t claimed your reward from the Wyvern Lord hunt yet, hit up the weapon shop for that before moving on. Moogle on over to the East Gate and make your way to South Bank Village.
Cactoid, Estersand Patient

Remember this little guy?
You probably still can’t stand toe to toe with that Wild Saurian, but if you don’t want to run away anymore even a mediocre Quickening will punch his ticket with ease. Talk to the Village Elder, and then Tchigri by the boat to go to the North Bank. Talk to Ruksel to realize that you are the one who caused all this trouble. Back in South Bank, talk to Dantro’s Wife, then check out the flower behind her hut. Go back to North Bank with the miraculously reincarnated Dran to finish off this portion of the quest. You are rewarded with the very handy Wyrmfire Shot. But now, we can finish off another Cactoid related quest we’ve been working on. Since the ferry is reopened, go north to the Broken Sands and grab three Valeblossom Dews (from the big pink flowers), and take them to Dantro’s Wife. The first two are right near the entrance, but the last one is up and around to the north, past the Wild Saurian. Don’t try to fight anything up here, swallow your pride and run shamelessly. When you get back to the North Bank, talk to the moogle for a map of the Highwaste, which will be useful later. Give the Dews and Great Serpent Skin to Dantro’s Wife, then exit and re-enter the village and talk to her again. The recovered traveler is behind her hut, and he will give you the Barheim Key and the outstanding Golden Amulet. This is the accessory to have equipped on inactive party members, as it will double their LP earned (everyone earns LP, even if inactive or KO‘d). You could go into the Passage to fight an optional Esper, but we have to go down there later anyway, so we’ll just consolidate our trips. You can beat Zalera at this level, so if you do want to go down there now just use the Immobilize glitch, and make sure you can protect against Sleep, Disable, and Blind. There may be a treasure chest in West Annex in a dead end behind several traps. Don’t open it yet, or you might screw yourself out of the ultimate shield.
| Optional Area Overview- The Barheim Passage Take 2 | ||||||||
| Rare Game | Level | HP avg | Weakness | Zone | Conditions | Steal/Drop | ||
| Minibug | 46-47 | 16,172 | Wind | East-West Bypass (east end) | Random, 20% chance to spawn | Wrath of the Gods (CS), Mace of Zeus (VRD) | ||
| Ithuno | 41-42 | 23,221 | Holy | Special Ops Sector 5 | Random, 20% chance to spawn | Deathbringer (RS) | ||
| Ishteen | 43-44 | 34,132 | Holy | East-West Bypass, Zeviah Span | Join Hunt Club, will appear within 8 ½ minutes of being in zone. | Soul of Thamasa (CS) | ||
| Loot to Look For | Dark Crystal x 11
CS/CD- Dead Bones |
Ancient Bone x 3
5% MD (Warmage)- Dead Bones |
Earth Crystal x 3
CS/UD- Bug |
Gigas Hat
Rare Steal from Dead Bones |
Back to the side quests- July
So much easier than a rare steal.
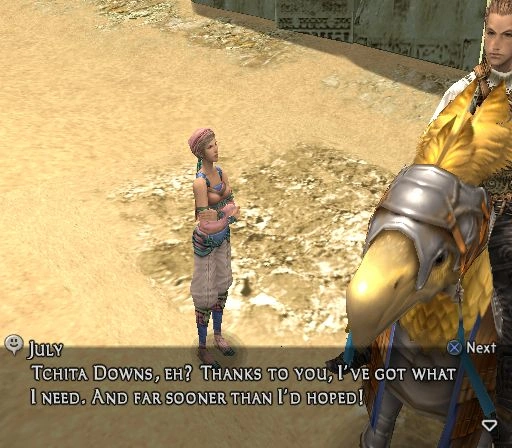
Go to Nalbina and find a spy named July near the save crystal. Walk over to the imperial soldiers who are anagrams of Biggs and Wedge to find out that not-Biggs hates the smell of chocobos. Rent one from the nearby moogle, then ride towards them, causing them to run away and leave their posts (they are begging for an Article 15 here). July will thank you, we’ll come back to her later. For now, we can do something so crazy, it just might make the rest of the game too easy. If you don’t feel up to it, don’t worry, I saved to a separate file, so I won’t use the overpowered weapon until after we go to the Necrohol for real. But if you think you can handle it, ride that chocobo north through the Mosphoran Highwaste.
| Area Overview- Mosphoran Highwaste | ||||||||
| Rare Game | Level | HP avg | Weakness | Zone | Conditions | Steal/Drop | ||
| Wary Wolf | 34-35 | 14,282 | Earth | Summit Path | Random, 7% chance to replace any Worgen in the zone | Hell's Gate Flame (RP) | ||
| Dheed | 49-50 | 77,740 | Water | Skyreach Ridge | Join Hunt Club, random (40% chance) | Mirage Vest (CS) | ||
| Grey Molter | 34-35 | 21,397 | Holy | Empyrean Way | Game clock between 10-20 minutes, activate Shrine of S Wind to reach area | Nothing good | ||
| Loot to Look For | Great Serpent's Fang x 2
10% MD (Hunter)- Python |
Beastlord Horn x 3
8% MD (Knight)- Humbaba |
Ring Wyrm Scale x 4
CD- Ash Wyrm |
Moon Ring x 3
10% MD (Dragoon)- Ash Wyrm |
| Area Overview- The Salikawood | ||||||||
| Rare Game | Level | HP avg | Weakness | Zone | Conditions | Steal/Drop | ||
| Spee | 36-37 | 14,780 | Water | Sun-Dappled Path | Random, 15% chance after any Wyrdhare is killed. Spawns in the dead ends. | Stardust (CS) | ||
| Rageclaw | 36-37 | 39,641 | Water | Piebald Path | Join Hunt Club, spawns near one of the exits if no enemies have been killed after 1 minute | Sickle Blade (CS) | ||
| Wood Toad | 35-36 | 51,697 | Lightning | Corridor of Ages (down the stairs) | Random, 20% chance (it’s invisible, so hit it with Reflected magic to start the battle) | Meh. | ||
| No important loot in this area. |
Insanity- Quest for the Zodiac Spear
We tread here on a fool’s errand
Basch
This is your mission, should you choose to accept it.
This section will get you the strongest weapon in the game, at an insanely low level, so be warned that you will be massively overpowered for the rest of the game if you do it. I recommend getting it now for the challenge, then not using it until you come back to the Necrohol to defeat the optional bosses. From Nalbina, ride your chocobo north to the Babbling Vale. There are some great items for sale here, including Golden Amulets and Thief’s Cuffs, so make sure you have three of the former and at least one of the latter. Save and continue north, running from everything you see. There is a Wayward Chocobo just outside the NE exit, you can ride him by feeding him a Gyshal Green if you want. You should have bought the map at North Bank Village (it‘s also available here), just follow it north to the Salikawood. After you hit the blue save crystal, exit to the west from the next area to get to Sun Dappled Path. There shouldn’t be any unfriendly enemies here, just neutral Wyrdhares. Move on to the north to Garden of Decay, then east to get to an orange crystal.
It’s good to be the king
Mel Brooks, History of the World Part 1
| Optional Boss Battle- King Bomb | |||||||
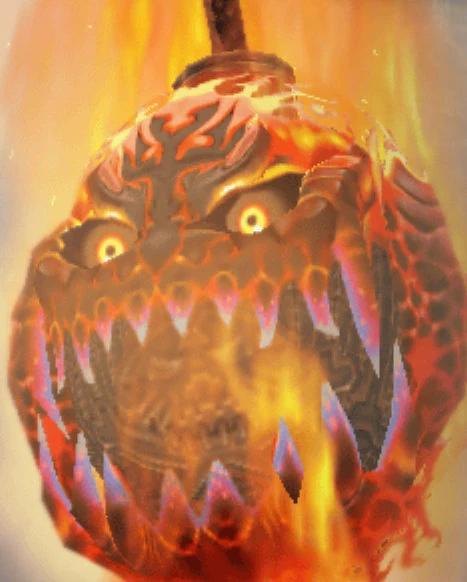
| |||||||
| Level | 34 | My Level | 15-16 | ||||
|---|---|---|---|---|---|---|---|
| HP | 37,596 | Difficulty | Hard | ||||
| Steal | Bomb Shell, Fire Crystal, Bomb Fragment | ||||||
| Status Immunities | Death, Petrify, Stop, Doom, Confuse, Sleep, Blind, Poison | ||||||
| Fire | Ice | Lightning | Water | Wind | Earth | Dark | Holy |
| Absorb | Half | Half | Weak | Half | Half | Half | Half |
| Summon Belias at the save crystal, then save to restore your MP before entering the battle. Belias will take out the little bombs, then do some damage to the King, absorbing all the Fire-based attacks along the way. Keep your summoner out of the way so King Bomb doesn’t target him/her, and as soon as you see Belias charge Hellfire, Dismiss him so he doesn’t heal your enemy. King Bomb can use Restore to gain back HP, so finish him with Quickenings before he does it, or let him do it twice and just keep wearing him down. I recommend Quickenings, as you will wear down first here. Seriously, do not let him Renew. You’ll have to be quick with switching out characters to start a new chain before he can target you, or worse, use Renew. When you Dismiss Belias set battle speed to slowest to help your Quickenings get in before the King can make a move. It isn’t easy, but if I did it, so can you. (The next time you talk to Montblanc, you will get a Mallet. Do NOT sell this.) | |||||||
| Optional Area Overview- The Necrohol of Nabudis | ||||||||
| Rare Game | Level | HP avg | Weakness | Zone | Conditions | Steal/Drop | ||
| Helvinek | 48-49 | 52,376/ 99,999 | Holy | Any | Kill six Oversouls on current trip to Necrohol | Grand Armor (VRD) | ||
| Vorres | 49-50 | 63,848 | Holy | Hall of the Ivory Covenant | Join Hunt Club, lure Dark Elemental to room SW of Cloister of Reason | Soul Powder (CS) | ||
| Loot to Look For | Holy Crystal x 9
UCD- Babil |
Grand Armor
VRD- Helvinek |
Maximillian
RD- Elvoret |
Aegis Shield
RD- Pandora |
| Optional Area Overview- Nabreus Deadlands | ||||||||
| Rare Game | Level | HP avg | Weakness | Zone | Conditions | Steal/Drop | ||
| Velelu | 46-47 | 37,279 | Holy | The Fog Mutters | One party member < 20% HP | Capricorn Gem (CS), Save the Queen (UD) | ||
| Arioch | 47-48 | 43,460 | Holy | The Slumbermead | Join Hunt Club, random (40% chance) | Sage's Ring (CS) | ||
| Loot to Look For- | Black Mask
VRD- Banshee |
Defender
VRD- Leynir |
Golden Skullcap
RS/VRD- Dead Bones |
| Crown of Laurels
RD- Crusader |
Yakei katana
VRD- Baknamy |
War God's Band x 4
5% MD (Warmage)- Leynir |
Silver Liquid x 5
UD- Foobar |
The Fool’s Errand continues- the Necrohol
So close...
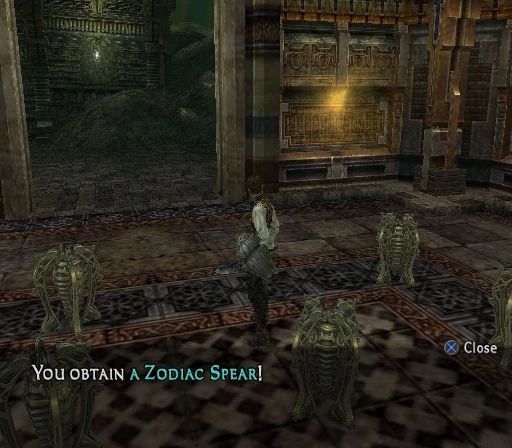
Save again at the orange crystal- you won’t be getting another- then go past the Bower to the Corridor of Ages, head south at the split to enter the Necrohol. This is your last chance to heed Basch’s warning, there’s no turning back once you move past the entrance. Here’s the bottom line about this area: anything that touches you, kills you. Make for the zone breaks as quickly as you can, then revive everyone and run to the next zone break. Setting battle speed to slowest helps delay your enemies’ attacks. Use the Immobilize glitch to its fullest potential here, leave one person stuck at the exit to the Salikawood and switch back to them as soon as you get far enough away to clear out the enemies. If you don’t know about this glitch, when a party member is Stopped or Immobilized, if your other party members get far enough away switching your Immobilized member to party leader and then switching back will make enemies disappear. This is vital to the Fool’s Errand, and very useful later on in the deepest sections of the Henne Mines. Immobilize targets the whole party, so be smart about casting it (only have one active party member). Go north as far as you can, then west, then around to the south and into the next zone. Congratulations on making it this far. Revive and move on. (If you try this a few times and just cannot get past that first group of Baknamys, you may want to try going through the Deadlands and into the Necrohol from the other side. It will take longer, but it may be worth trying). In Cloister of Distant Song, east and mostly north is the goal, it is much easier than the Hall of Effulgent Light was. When you hit Cloister of the Highborn, go east then north, to find a small room with 16 chests, your Zodiac Spear is in the front row, second from the left. The spear is 100% guaranteed since Diamond Armlets aren‘t available yet. Don’t open the other chests yet, you can get Dark Matter from them later. Now go back the way you came, you made it this far, don’t get killed on the way out. Once again, Hall of Effulgent Light is by far the most dangerous because the first enemies are so close to the beginning. If you make it past the first group, the Immobilize trick secures your escape. Congratulations, the Fool’s Errand is complete.
Here's a nice easy one for you
All right, that last quest was harder than a MF’er, so if you decided to forego it, no hard feelings here. Get to the nearest orange crystal or Aerodrome. This quest will be much easier, and provide a nice short-term reward. All you have to do is get a few people wasted out of their minds. Teleport or fly to Bhujerba, and let the hunt begin.
| $idequest- Bhujerban Lightweights | ||
| Zone | Location | Buyer |
| Aerodrome | Left of the save crystal when facing the exit, on top of some crates | Man sitting on a railing near an Imperial right behind you |
| Armor Shop | Just in front of the counter to the left | Person right in front of the counter |
| Weapon Shop | Go upstairs to find the bottle in the corner | Woman talking to a sitting man |
| Magic Shop | Look on a shelf upstairs | Guru right behind you |
| Travica Way | Just outside the magic shop, right by the entrance to Miner’s End | Man leaning on a wall outside the magic store |
| Khus Skygrounds | Left of the street merchant if you’re facing him | Woman leaning on the wall right across from merchant |
| Cloudbourne Row | On crates stacked at a dead end to the south | Patron right outside the Cloudbourne entrance |
| Cloudbourne Pub | On a drunk chick’s table (check the hunt board while you're here) | Seeq right across from the bar |
| Staras residence | Sitting on a table | Go back and sell to the Seeq at the Pub |
| Miner's End | Near the Gambit shop | Miner near the SE exit to the area |
| Clio's Technicks | To the left of the counter | Moogle on the red carpet |
| Gambit Shop | Bookshelf on the left wall of the upper area | Shop Clerk Seeq right in front of you |
| Kaff Terrace | Next to passed out Seeq on right wall | Woman in the NW section |
| Lhusu Square | Edge of the fountain right in front of the mine entrance | Miner next to the merchant |
I hope you enjoy sidequests
We aren't even close to finishing off everything that became available after the Tomb, so forget about advancing the plot and move along to the never ending sidequest, part 2.
<<< Previous Page | Main Page | Hunts/Espers | Next Page >>>
| Loot Inventory/ Bazaar Tracker | |||
| Important Loot | |||
| Taurus Gem x 3 | Tyrant Bone x 2 | Wind Magicite x 6 | Gnoma Halcyon x 1 |
| Snake Skin x 8 | Book of Orgain x 3 | Frog Oil x 2 | Aries Gem x 3 |
| Bat Wing x 1 | Putrid Liquid x 3 | Dark Crystal x 11 | Crooked Fang x 4 |
| Ancient Bone x 3 | Earth Crystal x 3 | Mallet x 2 | Holy Crystal x 9 |
| Great Serpent's Fang x 2 | Beastlord's Horn x 3 | War God's Band x 4 | Silver Liquid x 5 or 8 |
| Available Rare Bazaar Goods | |||
| Dark Stone x 3 | Green Liquid x 2 | Fish Scale x 2 | Capella/ Silent Shot |
| Dark Stone x 2 | Bat Fang x 1 | Rat Pelt x 2 | Short Bow/ Parallel Arrows |
| Water Magicite x 3 | Bat Fang x 5 | Yellow Liquid x 1 | Loxley Bow/Bamboo Arrows |
| Green Liquid x 3 | Water Stone x 5 | Yensa Scale x 2 | Vega/ Aqua Shot |
| Fire Crystal x 3 | Bomb Shell x 1 | ----- | Fumarole/ Poison Bombs |
| Crooked Fang x 2 | Fire Stone x 4 | ----- | Longbow/ Fiery Arrows |
| Fire Crystal x 3 | Bomb Ashes x 3 | Book of Orgain x 2 | Tumulus/ Oil Bombs |
| Salamand Halcyon x 1 | Yensa Fin x 2 | Wyvern Wing x 2 | Arcturus |