Ah, cheese and onion toasties, you working-class temptation you. Also, hot cherry chocolate. Just what I need on a cold day. Especially as I'm about to put myself (and by extension, you) through a pretty big challenge spike. Welcome to Part 15 of Apoqliphoth's walkthrough to Final Fantasy XII!
From Raithwall's Gate Crystal, warp to Rabanastre.
Rabanastre[]
Moogle over to the Sandsea. There are three hunts to accept: Marilith, Ring Wyrm and White Mousse. You can tell by the Hunt Ranks that they're going to be pretty tough. First up, Marilith. Accept the hunt from the Sandsea tavernmaster, then complete your shopping -- I recommend having at least 50 Hi-Potions and 20 Phoenix Downs before taking on the next hunt. Also, stop in at Amal's Weaponry and report the Wyvern Lord kill to Sherral.
Now head to Westgate (which sounds odd to me, because Westgate is a town near where I live that I visit frequently to see friends). Leave to the Dalmasca Westersand.
Dalmasca Westersand[]
From Galtea Downs, take the west exit to The Midfault. Here, go south and you'll soon find the zone-out to Shimmering Horizons. Head southwest from the entrance to the area and stick to the west side of the noticeable crag on the map. It leads down to a lower level and a cave.
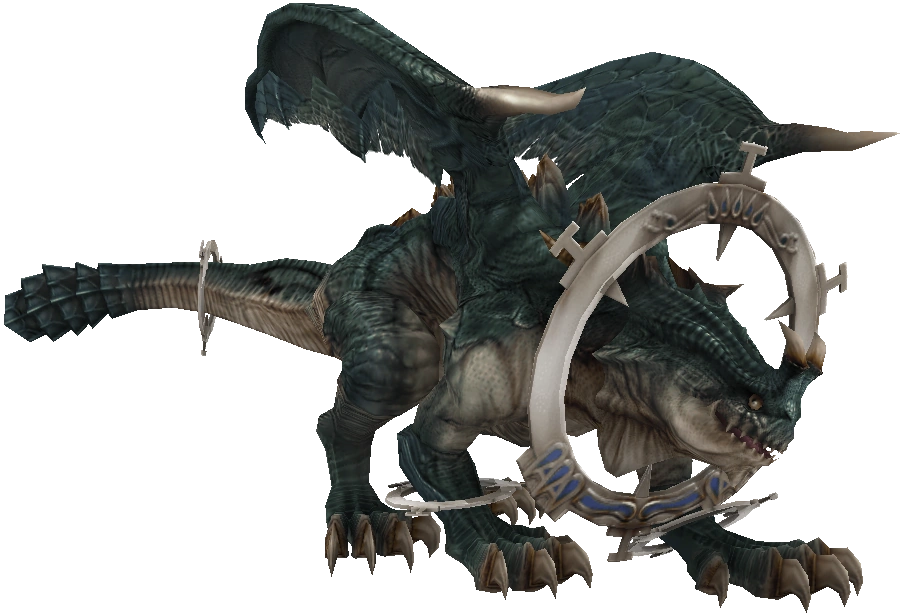
Zertinan Caverns[]
Enemies[]
There are a fair few traps here, so arrange your equipment accordingly. You begin in an area called Invitation to Heresy. I'd rather not thanks, I try to steer clear of that sort of thing. Anyway, you want to hang around the sunlight-dappled area in the south, just over halfway between the Westersand entrance and the southwest zone-out. It'll spawn in the corner.
Hunt 09: A Tingling Toast[]
| Mark: Marilith | |||||||||||||||||||||||
 |
Level: 38 Elemental Affinity:
Recommended Level: 27 | ||||||||||||||||||||||
|
| |||||||||||||||||||||||
| Strategy: This is going to take a while. It hits hard and fast, so cast Slow and Blind until they stick. During the first half of Marilith's HP bar it ignores evasion and shields, but Blind will make it miss occasionally. As long as you have Hi-Potions and Phoenix Downs on all three characters' Gambit setup you should be able to just grind her out. At the halfway point things get easier as she can longer ignore your evasion. If you do run out of items, switch them for Magick curatives and hope you last long enough. | |||||||||||||||||||||||
You receive Serpentwyne Must (Serpentwyne must what?), so hoof it back to to the Sandsea to claim your prizes. Also, stock up on Hi-Potions and Phoenix Downs -- did you think Marilith was hard? We're about to fight something with more than twice her HP. Yeah. The petitioner is Balzac, the Lowtownian who let Vaan into his secret society. Remember where he is? Sitting on the some boxes on the west side of the North Sprawl.
When you're ready, head to Southgate and teleport to the Westersand Gate Crystal. Save and exit east to Windtrace Dunes and search the south-central area for the big orange dot.
Hunt 07: For Whom the Wyrm Tolls[]
| Mark: Ring Wyrm | |||||||||||||||||||||||
 |
Level: 32 Elemental Affinity:
Recommended Level: 27 | ||||||||||||||||||||||
|
| |||||||||||||||||||||||
| Strategy: Oh boy. This bulky bastard is going to take a lot of punishment, so prepare for a long fight. You'll spend most of it stuck to the spot thanks to Immobilisega, but that's not much of a problem since you can still attack at. It can inflict Sap, and a Remedy boosted by the Remedy Lore 1 Augment will sort out both ailments. Breath hits for around 600 damage to the party, but if you have ~2,000 HP on each character it won't really matter. Rake is your standard physical, which Protect will deal with. This is much easier after the Tomb of Raithwall, but more of a challenge now. Plus, defeating it unlocks a handy Bazaar item, so stick with it. Unfortunately, Ring Wyrm is a massive chet and will use Restore after taking enough damage, which heals it for around 38,000 HP and prevents its attacks from being blocked, kind of like a reverse Marilith. I used up 59 Hi-Potions grinding him out -- his attacks aren't devasstating so it's a war of attrition you can actually win. | |||||||||||||||||||||||
With that hilarity out the way, return to Balzac in Lowtown and receive your prizes. Two-hundred measly Gil for all that work. The other rewards are alright though, especially the Icebrand. To make yourself feel better, go pay Montblanc at visit at Clan Centurio HQ to obtain:
- Hi-Potion x3
- Teleport Stone x2
You should also receive, for becoming a Headhunter:
- Ether x2
- Teleport Stone x2
Good lord, we're rolling in Teleport Stones. Not literally, because that sounds uncomfortable. Speaking of Teleport Stones (and I have just typed it a lot) you can now buy them from the Clan Provisioner at Muthru Bazaar. You can also buy the Nihopalaoa, one of the most amusing pieces of equipment ever invented.
Basically, it reverses the effects of every restorative and curative item -- so you can turn Potions into weapons and whatnot. The more creative-minded individual will realise that combined with Remedy (and each of the Remedy Lore Augments), you can inflict almost every status ailment in the game at once. This is phenomenally useful against certain marks and bosses, and is basically the reason we went through all the trouble of defeating Marilith and Ring Wyrm. Treasure it, huskies.
We're done here for now. I tried to fit in the White Mousse section, but even I have my limits and that particular hunt is far too awkward for now, and it becomes much easier after the Tomb of Raithwall. There's no shame in knowing when it's more practical to come back later. When you've sorted your affairs in Rabanastre, teleport back to King Raithwall's Tomb. I'll see you in the next part for that bit.
← Home
← Part 14: "Sun and Sandsea"
→ Part 16: "Where Writers Get Lazy"