Happy Festivus, Space Monkies! In order to celebrate this grand holiday, I, BlueHighwind, will now state my greivances with you guys and tell you how you've pissed me off in the last year. First, my female readers have not been reading this naked as I commanded in my FFVII walkthrough, you better get working on that. Second, I have yet to see any grizzly hobo sacrifices in my honor on the News. I better see some news reports of a hobo being chopped into the shape of a Q? in the coming week or else. Finally, I notice that many of my spelling and grammar errors have yet to be cleaned up. If you want to serve me, you'd better fix my mistakes already. That is all.
Calm Lands (Continued)[]
Well its been half a week since I last edited this walkthrough, and now that Christmas is over its about damn time to get back on the horse. Now where were we? Ah, yes, we had just grabbed 15,000 Gil from the Southeastern corner of the Calm Lands. Now head Northwest about 40° degrees (grab a protractor and measure exactly) or just head towards the white Square on your mini-map to reach a Save Point. You'll find a Shop here headed by an extremely hot chick in a bikini. However no matter how hot this chick may be, her Items are pretty much the same as back on the Airship. In the South though you'll find a moving fan machine that sells awesome Weapons but for horribly obscene prices. Once you leave the Calm Lands it will disappear forever.
You'll meet up with a dude in a funny outfit (are there any costumes in Spira that aren't hilariously stupid?) who will then explain how on top of being heretics, traitors, and polygamists we are now being blamed for killing Maester Elmer. Luckily Yevon is in disarray which means that we don't have to worry about an angry mob of religious fanatics chasing us across Spira. Go around and talk to gaggle of idiots. Rikku and Tidus both vow to somehow save Yuna from her inevitable death - though they have no idea how. Since these two combined have all the brain power of a 1,000 peanut shells, I seriously doubt they will come up with anything.
Once you're done with those fools, run around the back of the building to find a Lv. 2 Keysphere. Run as far West as you can, at the tip of the cliff on the West edge you can find the Al Bhed Primer Vol. XXIII. Only three more left, by now you should be able to read most of Al Bhed with little difficulty.
You can also talk to guy North of here to learn some Chocobo Riding. However for some very bizarre reason, we have to train the bird first. I hate to bring up FFVII because it just ruins my enjoyment of any Final Fantasy but still, you don't need to train the damn bird to ride it. I consider this change to be a bad one. Basically you have to try to get the Chocobo to ride in a straight line through the finish line, however it will be constantly turning away. You have to push it back on track by hitting the D-pad. The faster you do this the better and if you get it through the goal in under 12.8 seconds, the Chocobo will now be tame and you'll win an Elixer. This is actually kinda difficult, so it will take several tries.
You can play other games with your Chocobo as well, and since there's no reason to put it off till after Zanarkand, let's do it now. Dodger Chocobo has your bird fully at your command, however some dick is throwing Blitzballs at you to try and stun your noble steed. They come in groups of three but you get 16.8 seconds to do it. It takes a bit of effort to learn the rhythm, but this one is actually easier than the first exercise. You get a Lv. 1 Keysphere for winning.
The next challenge is Hyper Dodger which a hell of a lot harder. Now the Blitzballs will come all at once, and an annoying bird will fly at you. It just becomes insane, there's so much shit its almost impossible to dodge it. That bird comes out of nowhere. You're eyes on are on the Blitzball volley and that thing just whacks your Chocobo on its beak. The only way to dodge it is to run in a zig-zag pattern across the board. Even with a full 18.5 seconds its still very hard. Once you win, you'll get a Lv. 2 Keysphere. The final challenge is too much of a bitch to summarize here, and I'll put that one in with the other ridiculously hard fucking mini-games. If you do it perfectly you'll get a part of Tidus's Ultimate Weapon.
You can ride your Chocobo to the East to find the Monster Arena and the beginning of the Monster Catching Sidequest. I never found the time to finish this quest (it always stank of Pokemon - and if I wanted to play Pokemon I'd play my Silver Version). This is actually the one gaping hole in this walkthrough, because its the only thing I haven't done (well this and Blitzball). Perhaps somebody else can write that section for me. I only did enough to get Yuna's Ultimate Weapon fully powered-up so I'll just throw that information in with the other Celestial Weapons. If you must do this and/or that Chocobo Race now go see this page: Final Fantasy X/Walkthrough/Part 27.
The final optional thing around here is Belgemine, who is Southwest of the Save Point in a large dirt clearing. This is the final Aeon Duel that occurs on your main Pilgrimage. Though Belgemine does have a whole sidequest that we'll be doing later.
| ||||||||||||||||||
|
| ||||||||||||||||||
| ||||||||||||||||||
|
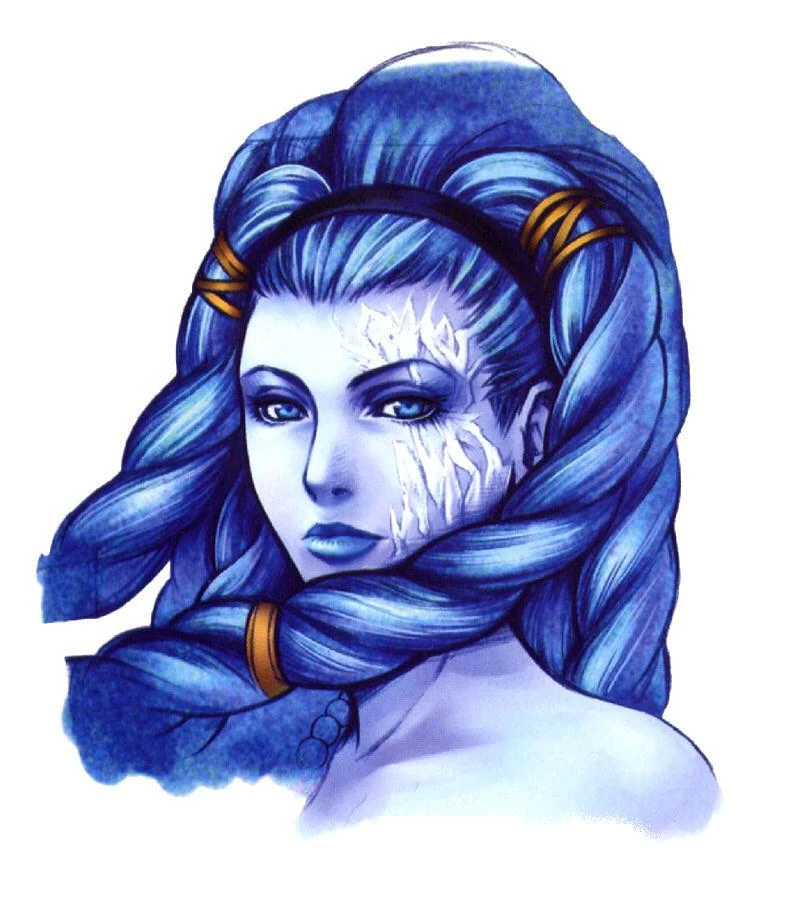
Strategy: Shiva is an Ice Queen, so naturally we need somebody with a mastery of Fire to take her down. No not Ifrit, that slow motherfucker will be massacred in this fight. I was talking about Bahamut's "Firaga". Basically open with the Dragon King's Overdrive (this might end the battle right here) then blast a "Firaga" to end it. Shiva will barely get a chance to attack. How sad, I love Shiva and I really don't want to have to fight her. But this is all necessary - the more Overdrives Bahamut pulls off, the better you'll be against Seymour on Mt. Gagazet. | ||||||||||||||||||
Belgemine will throw you 30 Power Spheres for winning (which can be sold for some loose Gil, we don't need that many) and an Aeon's Soul, which can raise your Aeons attributes. The ghost Summoner will then mention that she'll be waiting for Yuna at some place called Remiem. And who isn't thinking hot lesbian thoughts right now? Hey Yuna has needs, and as previously shown Tidus is not man enough to satisfy her.
When you're finally done with this whole thing, get on your Chocobo and ride to the Northeast exit to leave the plains. Run up and Save then cross the bridge. Two Guado envoys will come with an invitation from Seymour. However once we snub them, they send the muscle in:
| ||||||||||||||||||
|
| ||||||||||||||||||
| ||||||||||||||||||
|
Strategy: This fight just isn't as difficult as it should have been. Defender X has insanely powerful physical attacks. His normal attack hits for 2,000 HP. "Haymaker" will destroy any character hit by it. This is all added by counter called "Blast Punch" that takes away half your character's HP. Luckily this monster's Defense is not nearly as good as its offense. "Armor Break" will smash this guy and allow Tidus's attacks to actually matter. "Hastega" of course, and you can probably level half his HP before he kills enough of your players that you have to use it again. His elemental weakness can be exploited by a good portion of "Waterga" spells. Once his HP is down really low, he'll use "Mighty Guard" but by then you still should be able to finish him off before he gets another turn. Really this fight will see a lot of damage dealt for both sides, however if you come with a good amount of Phoenix Downs and if you are ready to hit fast and hard things will go your way in this duel. It should be over pretty fast. | ||||||||||||||||||

Cross the bridge to Mt. Gagazet. You can head down, but you'll only find an Optional Dungeon with monsters a tad bit too powerful for your team at this point. I'd say give this one a little more time, we'll come back once we have the Airship.
Mt. Gagazet[]
Yeah that's Zanarkand. We've almost walked the entire length of Spira, and after that final location, our Pilgrimage will be over. I'm not complaining, I am sick and tired of this whole "walking in straight line" thing.
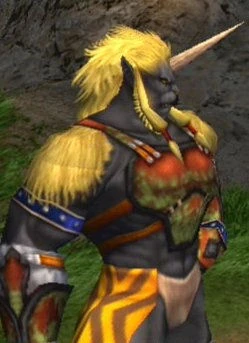
However before we even begin to dream of Zanarkand, we have a bit of a Blue Wookie problem. The only Ronso who can speak without sounding like a moron warns you that Mt. Gagazet doesn't really like infidels. I don't really care. I've been wanting to slaughter these bastard children of Chewbacca and Mystique since Besaid. However Yuna ruins my plans for a pogrom after giving a really lame speech that somehow quells the Blue Wookie Rage.
Save your game then head North, but first you'll have to fight two Blue Wookies in the final Boss battle of the page.
| ||||||||||||||||||
|
| ||||||||||||||||||
| ||||||||||||||||||
|
Strategy: Since these two only want Kimahri, I see no problem in leaving the big guy to play with his friends while we continue on our way. However the game won't let us, and thus we must fight this battle. Kimahri will fight alone this time (reason: unknown, some bullshit about honor). But don't worry, this is the easiest Boss you've faced in a loooooonng time. Even if you haven't been using Kimahri that often (ME!!!), it will still be very simple. These guys have shit health and their attacks are absolute jokes, nothing ever breaks 600 HP. Exchange shots and focus on Yenke. When the other one gets low on health, he uses "Mighty Guard" so you won't to kill his ally before that happens. Use Hi-Potions and "Lancet" to heal. This isn't difficult at all. You can even waste time and learn every Blue Magic in the game by "Lancet"-ing until you've compiled quite a collection. In my personal case this was the last time I ever used Kimahri. | ||||||||||||||||||

After the battle, Kimahri is honored by the defeated Wookies (tell me you wouldn't honor a guy with a spear to your throat). Then the Ronso promise to stop the Yevonites on our tail. Well this is excellent! Those idiot monkeys die valiently while we get to go forward without problem. If only every race we met were so willing to die for the cause.