Hamfruitcake here with her Final Fantasy X-2 Walkthrough. I'm quite pleased with how it's going so far. Let's hope these good feelings continue!
More Exploring[]
For now this is going to be covering the rest of your optional quests. I'll be covering your Hotspots soon, have no fear. It's just completing those two Missions means you have no choice and have to complete the Chapter and it's best to get all this treasure hunting out of the way first. You can by all means come back and check this page if you want and complete these side bits later. I'll let you know when you can; but I'm doing them now. So there!
Kilika[]
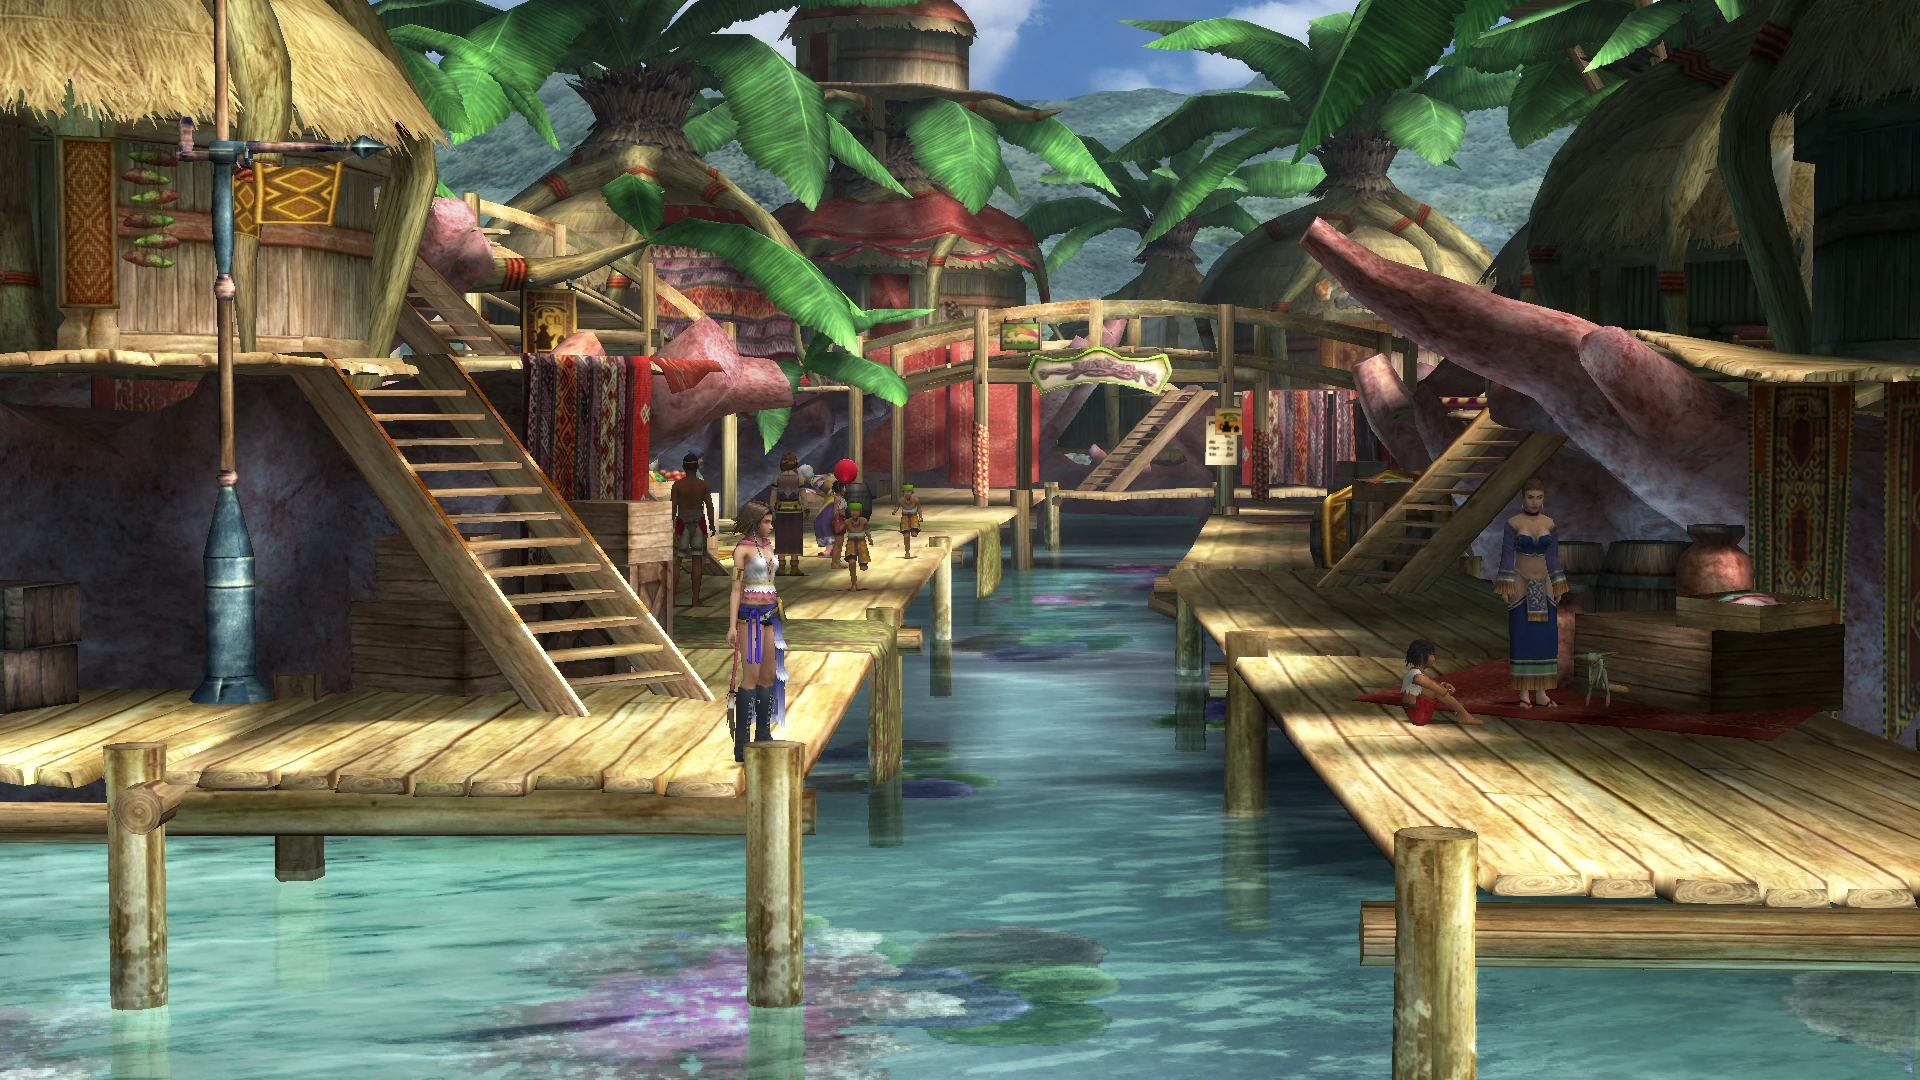
This place has definitely had the biggest face lift since Final Fantasy X, having been completely rebuilt and completely revamped. For now there isn't much treasure but a small little task to fulfill.
From the Save Sphere hop over the little boat to the jetty behind it and grab the Ether from the chest, there is also another chest hidden near the Save Sphere just to the left of the path across another conveniently parked boat. It contains a Mana Tablet. Run along and take the second staircase up and find Antidote x2 across the bridge. Take the bridge across to the other half of the village to find a chest with Eye Drops x2 and a Phoenix Down to the far bottom right of the jetty.
Now you can go into the next screen via the path north on the left hand side of the jetty. Go upstairs and to the left to find Barthello and Dona having a lovers tiff. Inside you'll hear Dona's side of the story. Upstairs will be a chest with 1500 gil to plunder. Very nice! Back in the village you'll find a chest with a Light Curtain to the right. Take the bridge across to the right and plunder the chest with the Lunar Curtain inside. You'll see a cameraman near here, talk to him and take him up on his offer to view the new Youth League. You can also find a Star Curtain and Holy Water x2 further along the right hand side of the jetty.
That's all there is to do in Kilika for now. The woods are sealed off so feel free to leave when you've lost interest.
Guadosalam[]
The Guado no longer reside in their home town and have instead fled to perish along with Macalania. Now the city is a place where Sphere Hunters while away their time. Leblanc has also turned Seymour's Mansion into her own personal Chateau it would seem. Nothing is right here anymore...
Head up to the Farplane for Yuna to increase your percentage a tiny bit more by claiming she'll never enter the Farplane just incase a certain someone is there... Fortunately it's closed off as it's going a bit haywire and without the Guado around it's not safe.
There is nothing else to do here, or treasures to pick up so let's head to the next area just at the exit to the bottom of Guadosalam.
Thunder Plains[]
What do you know. Rikku did overcome her astrophobia. Less whining now that's for sure. And you'll discover the Al Bhed have re-calibrated the towers so no more getting zapped by lightning. No more lightning dodging. Bliss!
Before you enter the second screen, on the right hand side you will find a Black Chocker. In the Northern area, you'll find a chest straight away with a Phoenix Down. Further along will be Grenade x2, then there'll be an Ether under the particularly big lightning tower and that's everything. Very pointless. Good grinding though.
Calm Lands[]
Entering the Calm Lands will prompt a scene and you'll be approached by two warring companies. Open Air and Argent Inc. Rikku and Paine provide you with 100 credits for each and you are given the option of campaigning for either company across Spira by hitting ![]() . This is a big undertaking which will be covered later by me. You can also take the hover around the Calm Lands to play different mini games for 10 credits, and of course to the exits of the Calm Lands. Ride the Hover 10 times to get a half price Discount with the Calm Lands Discount Pass you'll receive, it works for both companies and you'll only have to pay 5 credits to ride the Hovers. Neat indeed.
. This is a big undertaking which will be covered later by me. You can also take the hover around the Calm Lands to play different mini games for 10 credits, and of course to the exits of the Calm Lands. Ride the Hover 10 times to get a half price Discount with the Calm Lands Discount Pass you'll receive, it works for both companies and you'll only have to pay 5 credits to ride the Hovers. Neat indeed.
You'll land at the Agency where you can pick up some items from the shop and start a very long winded mission by talking to the bloke on the right.
There goes the Bride[]
I'll cover this more extensively later but for now, just say Why Not? to the blokeys request and agree to help him find his son a bride. From now on you can approach the women of Spira with the ![]() button and ask them from a list of 5 options if they are interested. Depending on how they respond, you'll get points. It all gets very complicated but for now, just start the mission.
button and ask them from a list of 5 options if they are interested. Depending on how they respond, you'll get points. It all gets very complicated but for now, just start the mission.
There are also a bunch of mini-games for you to play with the agencies in the Calm Lands for you to peruse and enjoy and apart from that you can also find some treasure around the vast expanse too. I'll cover the treasure now.
- Chocobo Feather x2 (top left)
- Phoenix Down (To the left of the exit to Gagazet)
- Ether (bottom right corner)
Now take the North Eastern Exit to approach Mt. Gagazet. Cross the bridge and run along the left to find a chest with Potion x2 inside and then take the path underneath the bridge to the Cavern of the Stolen Fayth at the Gorge Bottom. At the Gorge Bottom grab the chest with the Phoenix Down and talk to the people around. Unfortunately the Cave is closed for business as they are planning something exciting. Talk about a ginormous waste of time. But hey... Treasure! Right?
Mushroom Rock Road[]
Upon arriving you'll spot Ormi and Logos making a run for it. Chase them to meet Yaibal, it's always best to answer in the affirmative to keep people happy. At this point you'll learn about the Youth League and a familiar face will explain further. Once again the Youth League, cousins of the Crusaders, will be organizing an Operation, sounds familiar... Unfortunately they can't seem to solve the Mushroom Rock Road's fiend problem and Leblanc's sex slaves have offered to help.
At this point you should be more than levelled enough to face the fiends in this area so agree to 'run the gauntlet' when he asks. Clasko will show you the way! And here was me thinking he was better suited as a Chocobo Breeder, talk to him to voice his doubts on this before entering the Road.
Foggy Fiend Frenzy[]
Nothing to worry about here. Just more fiends attack when it gets foggy. Well that suddenly makes sense... Take the lift up to begin the mission. Fiends only attack when it gets darker and foggy as the game would have you believe. Every few steps will engage you in a random battle. Take out the groups of Elements with multiple hitting Black Magic of the opposing element, so you'll be using Blizzard or Blizzara and hitting the horizontal directional buttons in order to take them all out much more quickly. The only issue here would be the Tonberry enemies, although relatively easy to fight they also come packed with 9,999 HP which is something you will spend a lot of time grinding down for minimal reward currently. Escape is your best option in this case. Otherwise with a competent Black Mage all of the battles should be relatively easy.
Follow the goons down the steps to find a chest with a Turbo Ether and keep heading north (ignore the dead end) to find a Phoenix Down in a chest too. Continuing on you'll find a Hi Potion and a Save Sphere right next to a special entrance. You'll find the pair there trying to stick spheres in an ornate door and receive Crimson Sphere 9, and yes there are plenty more where they came from. Fortunately the troublesome duo disappear without any need to do battle so it's all good in the hood. Touch the door to investigate, it'll light up one line but that's it. If my suspicions are correct then we'll need the rest of those Crimson Spheres to open the door fully. Watch this space.
Maroda will then appear, long time no see! It appears that Maroda is guarding the place now, fine! Head back to the steps up the Mushroom Rock Road and run along the path until you reach the lift upwards. You'll now be at the finish line, hooray! Here you'll meet Elma who is now captain and still wearing a very nice outfit by my standard (or this games...). Mission Complete! You'll receive a Glass Buckle and the Heart of Flame Garment Grid for your pains.
At the Headquarters[]
Run past the lift to grab the Favourite Outfit in the chest below and then take the lift up to 'Headquarters'. Follow the Red Arrow and Yuna will give an introduction. The Youth League is essentially the Crusaders without Yevon in the way to fart all over it. The head honcho is Nooj and we'll be meeting him soon enough. Take the small path down to the right to find the Restless Sleep Garment Grid before approaching the Headquarters. Hey look it's Lucil, man all these Chocobo Knights have really found their feet now... Oh what a pity we can't go inside.
I didn't mean you'd meet Nooj now! After this exchange you'll find Maechen wandering about and having a sit down to the right of the tent. Man I love this guy. He'll fill in the gaps in your knowledge regarding the past two years. He will ramble on for quite a while but I really can't let him stop... He's so sweet! Being historian myself I wish I could be as knowledgeable as him of my own world. Just without the theatrical old man voice. Do not by any means tell him to shut up. Continue with his lecture and he'll ask to shake Yuna's hand and he'll say he can go in peace, don't go Maechen. Of all the NPCs I like you the bestest, even if you don't know how old you are...
Now board the airship and land back on Mushroom Rock Road. You'll find Clasko racking his brains not far from the Save Sphere. He's trying to find his calling and will ask to come aboard the Airship until he does. This place is getting awfully cramped what with O'aka and now Clasko hitching rides but whatever... Say yes. No questions asked. Next location!
Bevelle[]
Not much to do here aside from get a little introduction from Yuna. She was born there but she doesn't really like the place much, she did get sentenced to death there, marry a dead man, kill the dead man... and well it's not a place of happy memories being the heart of the corrupt Yevon and all that. Talk to the baldy monk on the right to get a lift up the Highbridge. In the next screen a nun will lead you to a very cheerful monk who will then summon the Praetor assuming Yuna wants to see him as she wants to be a part of the the New Yevon gathering.
At this point Yuna wants to leave as she appeared to have an arrangement of some sort figured out. But unfortunately the Praetor appears... So it looks like the Chairman and the son have lost their jobs so Yuna doesn't have to marry anyone. He does an admirable job of trying to sway you towards his side of thinking. At least he gave us an audience unlike a certain Nooj... This all goes towards your percentage of completion so don't think I'm just taking you on a wild goose chase. We can now leave and go to our final location before completing those godamn hotspot missions.
Mt. Gagazet[]
Kimahri is now the elder of Mt. Gagazet. There are not many Ronso left to be fair and it's also, according to Yuna, quieter because no more Summoners climb the mountain as they used to. But I think it's more to do with the fact that Seymour slaughtered all of them... Just me... Looks like some pups called Lian and Ayde have gone off to search for a way to fix Kimahri's horn. They do have their furry hearts in the right place but it would seem this does not make the other Ronso happy.

Tell Garik you'll take care of the missing Ronso pups and hopefully he won't be too upset. A fight will occur with him later in the game and you'll need to gain the Ronso's trust in order for him to be easier to defeat and get a higher percentage. To get the highest reward, a statue of Yuna being built and a good percentage addition, you'll need to gain the trust of the Ronso by answering to them favourably in such a way. You've already pleased Garik but what about the rest?
Talk to Kimahri for him to ask you to bring the pair back to Mt. Gagazet. Is that the beginnings of a mission I wonder? Keep talking to Kimahri until he asks you a question, tell him 'You have to learn to deal with these things' in order to receive the Trainer dressphere later.
Now for the Ronso trust gaining:
- Talk to the Ronso lady next to Kimahri and tell her to 'Leave it to the Gullwings!'
- Next talk to the Ronso walking around near them and answer 'I can imagine how you must feel'
- The Ronso lady to the far right will rant about the guado, tell her 'I'm sure you're right'.
- Tell the Ronso in deep conversation to the left 'I wouldn't forgive them either' in response to his rant about the Guado.
- Another Ronso walking around will say that many Ronso lost their life defending Yuna, reassure him 'I will never forget their sacrifice'.
The Ronso lady at the entrance will mention building a monument to Ronso glory but who to build it of... Hmmm... Perhaps a certain strong willed High Summoner who still lives today?
And the last Ronso to gain the trust of:
- Take the teleport to the left of her to reach the Fayth Scar, a little forward from the teleporter will be a lone Ronso by the stairs. He'll see with the fayth gone change is inevitable, tell him 'A change for the better I hope.'
And with that done you're finished here for now so teleport back to the gate and leave Mt. Gagazet via the Save Sphere.
Now finally we can get on with those Hotspots!