After a period of relative silence following the Calamity, the Serpent Reavers have once again taken to terrorizing the inland hamlets of La Noscea─killing the men, kidnapping the women and children, plundering the storehouses, and burning what little they leave behind. For years, it was not known how the pirates were able to raid areas so far from the coast, until a local shepherd sighted a band of painted ruffians entering the Sastasha Seagrot, carrying large quantities of sacks and crates. Could it be that there is more to this cave than meets the eye?
Duty finder description
Sastasha is the first dungeon that players will encounter in Final Fantasy XIV. This grotto hides a den for the Serpent Reavers, pirates aligned with the Sahagin and led by Captain Madison, from which they launch their raids into Lominsan settlements. It is part of a trio of consecutive low-level dungeons alongside ![]() The Tam-Tara Deepcroft and
The Tam-Tara Deepcroft and ![]() Copperbell Mines, all sharing the same loot and serving to acclimatize new players to partying with others. A hard mode of Sastasha was released in patch 2.4.
Copperbell Mines, all sharing the same loot and serving to acclimatize new players to partying with others. A hard mode of Sastasha was released in patch 2.4.
Objectives[]

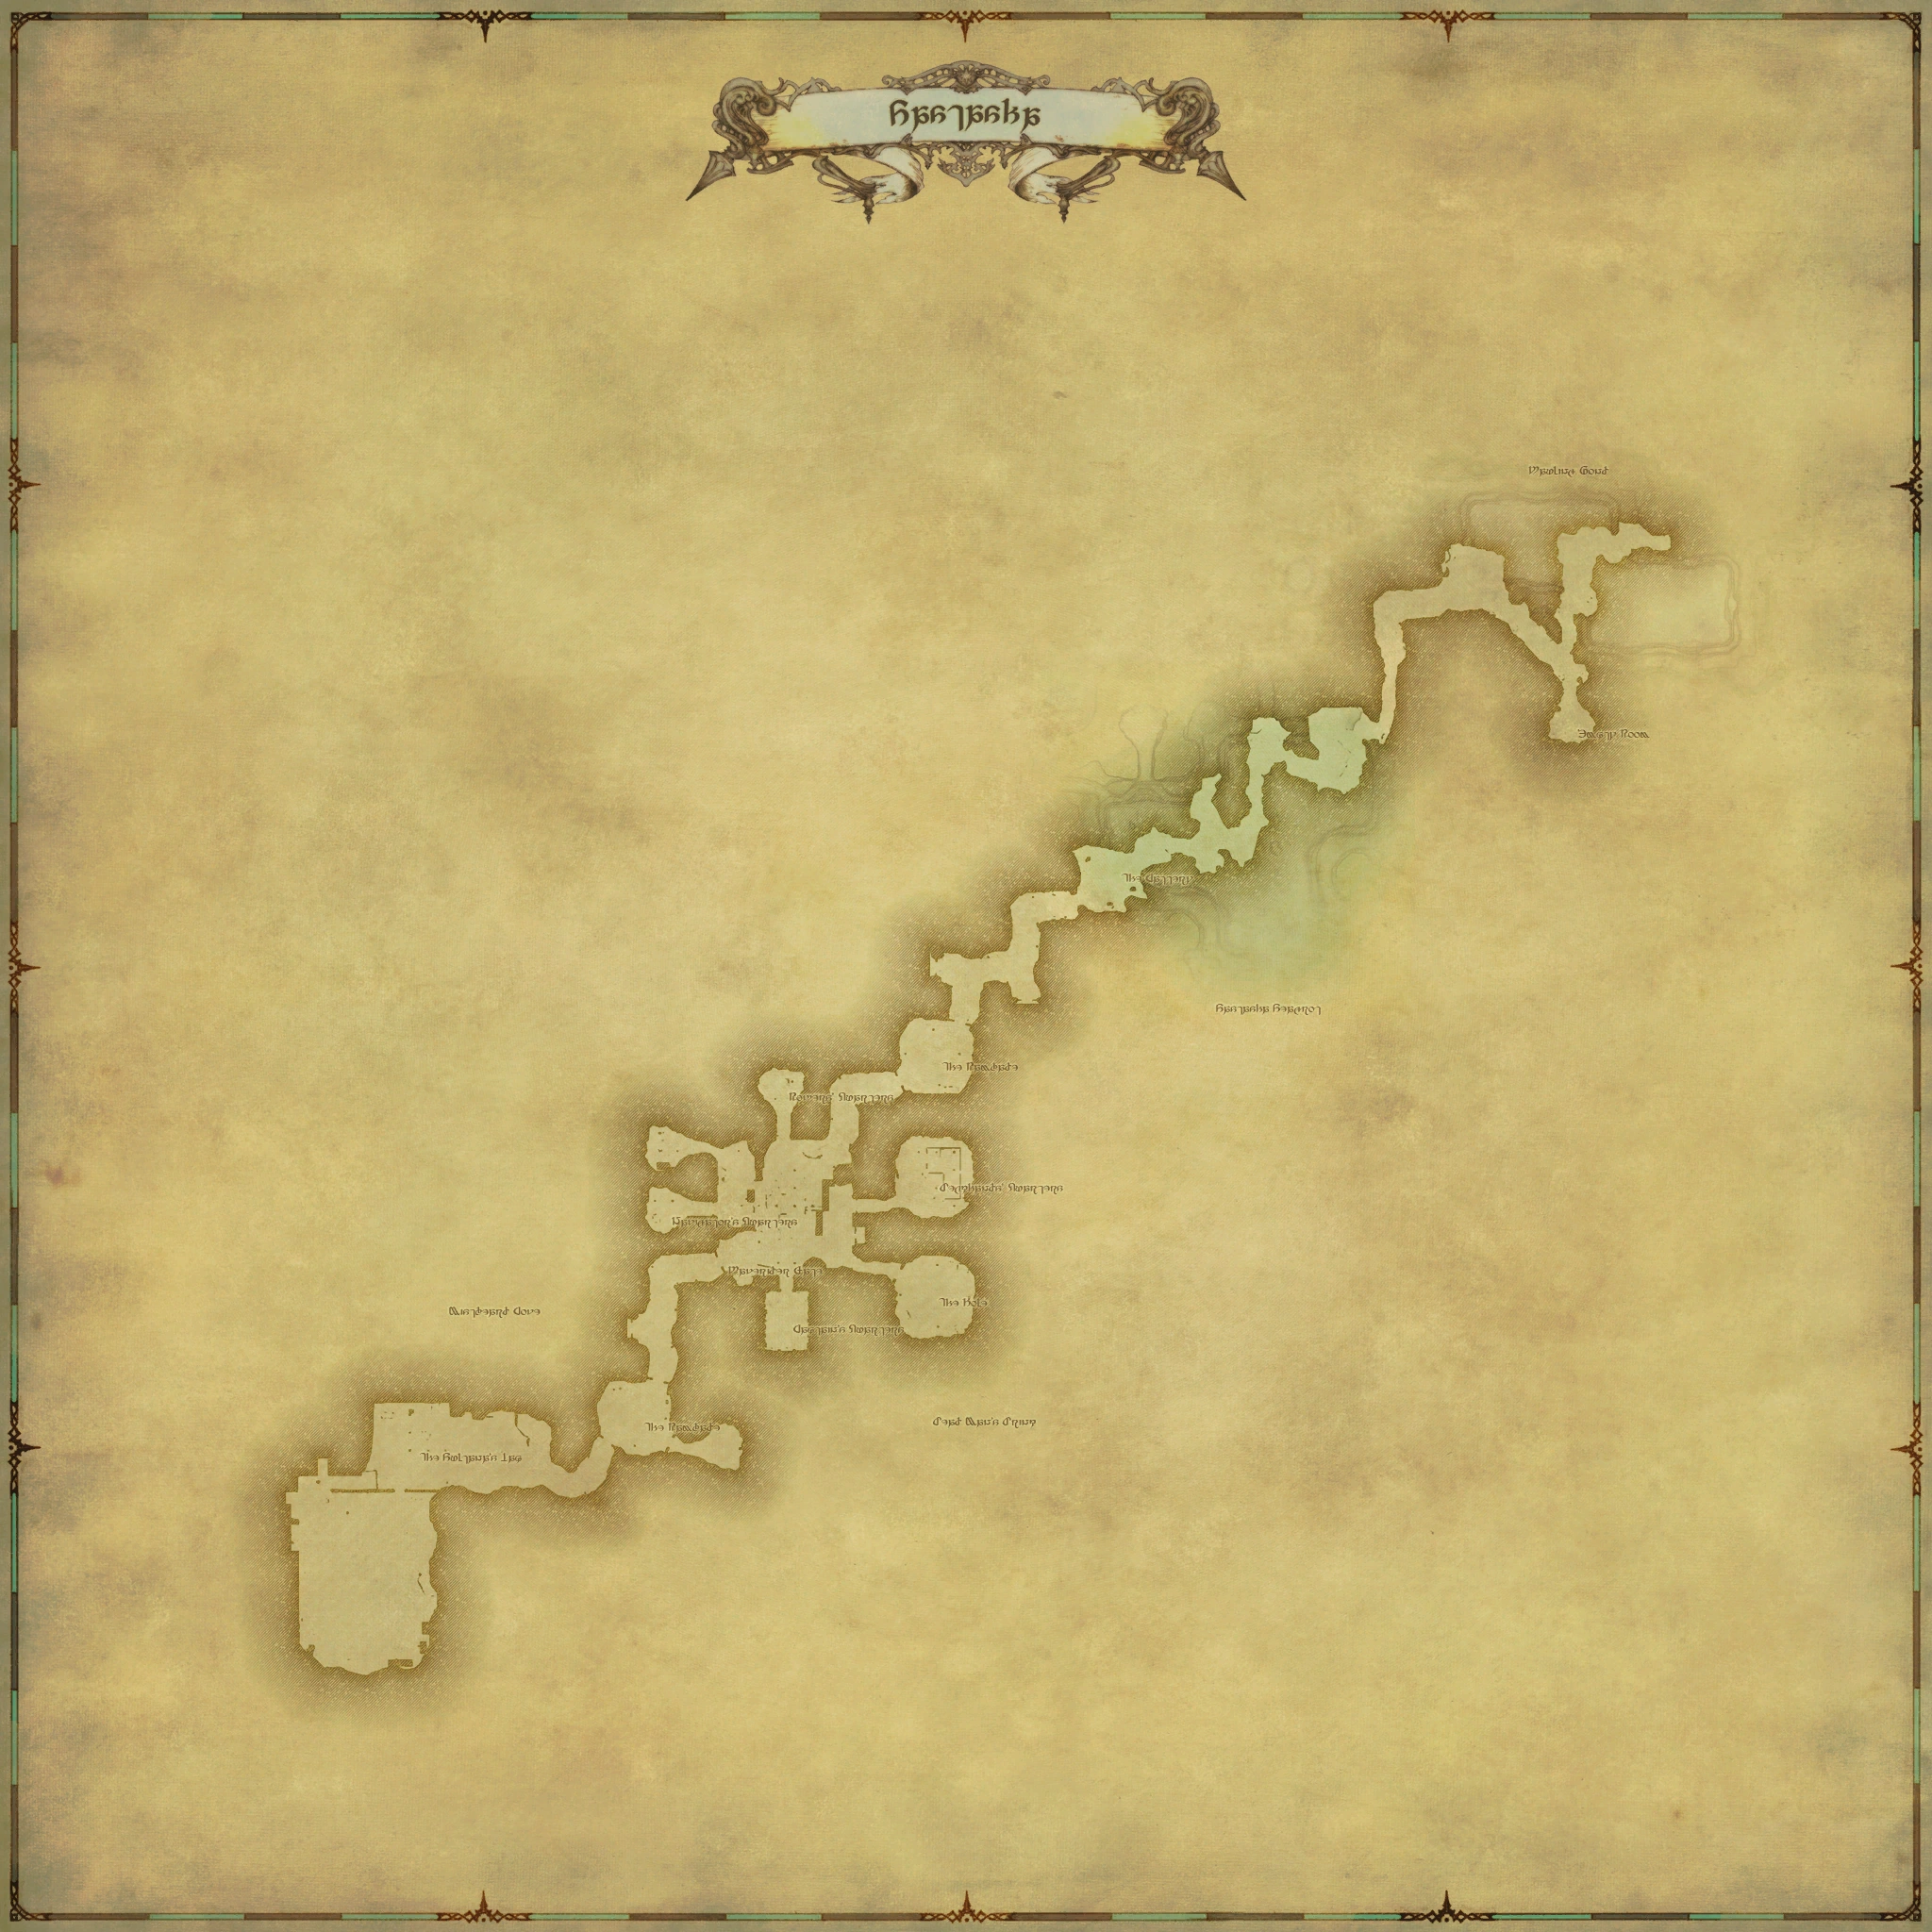
Map of Sastasha.
Objectives are paraphrased and expanded on from their in-game listing for clarity.
- Activate the coral trigger
- Defeat Chopper and open the hidden door
- Discover and defeat Captain Madison
- Obtain the Waverider Gate key and open Waverider Gate
- Defeat Captain Madison again
- Defeat Denn the Orcatoothed
Progression[]
Sastasha Seagrot[]
Wauling Pond, Empty Room, and the Cattery[]
The path to the first boss is a winding one with a handful of dead ends. Immediately after the first group of enemies a small room can be found. It contains a bloody memo that can be examined by a member of the adventuring party before proceeding. This note contains a piece of information regarding the coral formations found in the Cattery, informing the party of which they should touch so as to avoid triggering the trap. The note will state that "The Capten lykes" an object and its color. The options are "his sees Bloo," "his wyne Redd", and "his kebbage Green", indicating blue, red, and green respectively.
Continuing down the path will lead to the Cattery, a large area tightly packed with enemies. A number of Giant Clams are found interspersed through the area accompanied by Shade Seekers, the clams alternating between an open and closed state, becoming invulnerable to damage while closed. The clams will spawn up to two Shade Seekers every time they open if less than four Shade Seekers are alive; however, the clams will not aggro if they aren't attacked, so it is possible to just skip by them and be out of aggro range of any subsequent Shade Seeker spawns. A treasure coffer containing the crafting ingredient ![]() Seagrot Water may be found on a side path mid-way through the room, but requires defeating another Giant Clam to reach.
Seagrot Water may be found on a side path mid-way through the room, but requires defeating another Giant Clam to reach.
There are no barriers to progression between the duty entrance and the end of the Cattery. Daring parties can potentially chain pull all the way to the first boss, taking care to avoid the optional packs of Shade Seekers in the Cattery.
Inconspicuous Switch[]
| Encounter overview | |||
|---|---|---|---|
| Action | Phase | Description | Details |
| Phases | Phase 1: 100-70% HP Phase 2: 70-40% HP Phase 3: 40-20% Phase 4: 20-0% | ||
| Attack | All | Melee auto-attack. | |
| Charged Whisker | 2-4 | Inflicts 15s |
|
Upon arriving at the end of the Cattery the party will find three coral formations of varying colors. Interacting with the formation corresponding to the color indicated on the memo earlier will reveal the Inconspicuous Switch. Should a player choose the wrong color they will be inflicted with a dispellable ![]() Poison for two minutes and spawn a Cave Aurelia.
Poison for two minutes and spawn a Cave Aurelia.
Interacting with the inconspicuous switch will immediately spawn Chopper, the first boss. Chopper is a simple fight, with only one easily avoided ability that it uses sparingly. At 70%, 40%, and 20% HP it will use Charged Whisker, a radial AoE that does no damage but will inflict ![]() Paralysis on anyone hit by it. Beyond this Chopper will only auto-attack.
Paralysis on anyone hit by it. Beyond this Chopper will only auto-attack.
The inconspicuous switch will not function again until Chopper is defeated. Interacting with it afterwards will open a hidden door, allowing passage deeper into the dungeon.
Dead Man's Drink[]
The first Rambade[]
| Encounter overview | |||||||||||||||
|---|---|---|---|---|---|---|---|---|---|---|---|---|---|---|---|
| Mechanic | Phase | Description | Details | ||||||||||||
| Phases | Phase 1: 100-80% HP Phase 2: 80-50% HP Encounter ends at 50% HP | ||||||||||||||
| Attack | All | Melee auto-attack. | |||||||||||||
| Shallowtail Reavers | 1 | Two Shallowtail Reavers accompany Captain Madison.
| |||||||||||||
| Fast Blade | 2 | Untelegraphed melee damage to primary target. | |||||||||||||
After proceeding down a short corridor with only a single pack of enemies, the party will encounter Captain Madison alongside two shallowtail Reavers. None have any abilities beyond basic weaponskills, and Madison will flee the once he drops below 50% HP. Unlike other boss encounters his minions won't despawn upon his defeat, preventing the party from being able to ignore them.
Central Dead Man's Drink, Captain's Quarters, and Waverider Gate[]
Chasing after Captain Madison will lead the party into Dead Man's Drink, a sprawling pirate hideout crawling with Serpent Reavers. Madison will flee through the Waverider Gate in the southwest corner of the room, and the party will need to obtain the ![]() Waverider Gate Key to follow after him. To quickly pass through this room, players can ignore all other side rooms and proceed directly to the south. Along the way they will encounter a shallowscale Reaver who will drop the
Waverider Gate Key to follow after him. To quickly pass through this room, players can ignore all other side rooms and proceed directly to the south. Along the way they will encounter a shallowscale Reaver who will drop the ![]() Captain's Quarters Key, allowing access to the Captain's Quarters at the south end of the hideout. Upon entering the Quarters the party will encounter a particularly burly shallowtail Reaver with twice as much HP than usual who will drop the Waverider Gate key when defeated.
Captain's Quarters Key, allowing access to the Captain's Quarters at the south end of the hideout. Upon entering the Quarters the party will encounter a particularly burly shallowtail Reaver with twice as much HP than usual who will drop the Waverider Gate key when defeated.
[]
More adventurous parties or players seeking to fully map out Sastasha may wish to explore the various side chambers in Dead Man's Drink, which contain additional treasure. The Rowers' Quarters to the north and the unnamed room to the northwest are the least fruitful of these, containing no treasure and only enemies. The Navigator's Quarters to the west, Deckhands' Quarters to east, and the Hole to the southeast each contain a coffer. The Deckhands' Quarters can be explored without engaging any enemies, as they will start fighting amongst themselves as soon as the party enters, allowing the party to collect the coffer without drawing any attention. The Hole requires ![]() The Hole Key to enter, which is conveniently found right outside the door.
The Hole Key to enter, which is conveniently found right outside the door.
The second Rambade[]
| Encounter overview | |||||||||||||||
|---|---|---|---|---|---|---|---|---|---|---|---|---|---|---|---|
| Mechanic | Phase | Description | Details | ||||||||||||
| Phases | Phase 1: 100-80% HP Phase 2: 80-50% HP Phase 3: 50-20% HP Encounter ends at 20% HP | ||||||||||||||
| Attack | All | Melee auto-attack. | |||||||||||||
| Fast Blade | All | Untelegraphed melee damage to primary target. | |||||||||||||
| Shallowtail Reavers | 1 | Two Shallowtail Reavers accompany Captain Madison.
| |||||||||||||
| Sandslinger | 2-3 | Inflicts 15s |
|||||||||||||
| Scurvy Dogs | 3 | Four Scurvy Dogs appear at 50% HP.
| |||||||||||||
Captain Madison is once again encountered beyond Waverider Gate with two shallowtail Reavers, but now instead of fleeing below 50% health he will summon four Scurvy Dogs from the southeast corner of the room. The tank should be prepared to gather up the dogs before they start harassing the rest of the party. The dogs have no abilities and very low HP, and can be quickly put down by what few AoE abilities the party may have at this level. Madison will once again flee once he falls below 20% HP, and leave the party to deal with the remaining adds.
Mistbeard Cove[]
The Sultana's Lap[]
Following the Captain to the Sultana's Lap will reveal another room full of pirates. There is not reason to clear out the entire room, and if the party keeps to the south wall they should be able to proceed to the final arena while avoiding the packs in the pavilion to the north.
Spawning grounds[]
| Encounter overview | ||||||||||||||||||
|---|---|---|---|---|---|---|---|---|---|---|---|---|---|---|---|---|---|---|
| Mechanic | Phase | Description | Details | |||||||||||||||
| Phases | Phase 1: 100-80% HP Phase 2: 80-60% HP Phase 3: 60-40% HP Phase 4: 40-0% HP | |||||||||||||||||
| Attack | All | Melee auto-attack. | ||||||||||||||||
| Hydroball | All | Deals damage and inflicts 3s |
||||||||||||||||
| True Thrust | All | Untelegraphed melee damage to primary target. | ||||||||||||||||
| Jumping Thrust | 2-4 | Untelegraphed melee damage to primary target at 80%, 60%, and 40% HP. | ||||||||||||||||
| Unnatural Ripples | 2-4 | The Unnatural Ripples in the arena activate, each spawning a Baleen Guard if they aren't deactivated in time. Two Ripples activate at 80% HP, three at 60%, and four at 40%.
| ||||||||||||||||
Denn will appear upon entering the southern platform, dispatching Captain Madison in the process. At 80%, 60%, and 40% HP, the unnatural ripples around the room will start bubbling—first only two of them, then three, and finally all four. Players can interact with the ripples to disable them. If they are not disabled in time, a Baleen Guard will spawn from each bubbling grate. The guards have low HP and can be killed quickly, but it is important that the tank aggro them immediately before they start harassing the healer and DPS. Denn's abilities are otherwise fairly basic, with a couple instant-cast weaponskills and a conal AoE.
The encounter can be fairly trivial if the party focuses on disabling the unnatural ripples, preventing any Baleen Guards from spawning. The first two sets of adds can also be phase skipped if the party deals enough damage to Denn to start the next set, as their spawn timers will reset at each phase. The last set can be difficult to prevent any from spawning, but as Denn will be on his last legs at this point any guards that appear can generally be ignored in favor of focusing on the boss.
Interactive map[]
Enemies[]
| Enemy | Pic | HP | Abilities | Areas |
|---|---|---|---|---|
| 315 | Ambuscade, Attack, Water Cannon | The Sultana's Lap | ||
| 905 | Attack | Sastasha Seagrot | ||
| 4785 | Attack, Fast Blade, Sandslinger | Dead Man's Drink | ||
| 905 | Attack, Numbing Tendrils[note 2] | Sastasha Seagrot | ||
| 3828 | Attack, Charged Whisker | Sastasha Seagrot | ||
| 5869 | Attack, Hydroball, Jumping Thrust, True Thrust | The Sultana's Lap | ||
| 905 | Attack, Small Claw | Sastasha Seagrot | ||
| 319 | Invulnerable when closed Summons Shade Seekers upon opening[note 3] |
Sastasha Seagrot | ||
| 905 | Attack, Gnaw, Feeding Frenzy | Sastasha Seagrot | ||
| 269-905 | Attack | Dead Man's Drink The Sultana's Lap | ||
| 24-80 | Fire | Sastasha Seagrot | ||
| 905 | Attack, Gutripper[note 5] | Dead Man's Drink The Sultana's Lap | ||
| 905 | Attack, Heavy Shot, Raging Strikes[note 6] | Dead Man's Drink The Sultana's Lap | ||
| 994 | Attack, Cure, Fast Blade[note 7] | Dead Man's Drink The Sultana's Lap | ||
| 905-1811 | Attack, Heavy Swing, Overpower[note 8] | Dead Man's Drink The Sultana's Lap |
Items[]
Each party member is guaranteed to receive one of the below weapons or pieces of armor useable by their current discipline upon completion of the duty, in addition to any other items received.
| Source | Item |
|---|---|
Sastasha Seagrot - The Cattery |
Chance for one armor from the following: |
Sastasha Seagrot - The Cattery |
Guaranteed one armor from the following:
Guaranteed one accessory from the following: |
Dead Man's Drink - The Rambade |
Guaranteed one armor from the following:
|
Dead Man's Drink - The Hole |
Guaranteed one armor from the following:
|
Dead Man's Drink - Deckhands' Quarters |
Guaranteed one armor from the following:
|
Dead Man's Drink - Navigator's Quarters |
Guaranteed one weapon from the following: If Plundered Falchion was received above, guaranteed the following:
|
Mistbeard Cove - The Sultana's Lap |
Guaranteed one weapon from the following: If Plundered Falchion was received above, guaranteed the following: |
Quests[]
Sastasha is unlocked during the main scenario quest ![]() It's Probably Pirates, and completion of the duty is required to continue the main scenario. In addition, defeating Denn the Orcatoothed is one of the requirements of the
It's Probably Pirates, and completion of the duty is required to continue the main scenario. In addition, defeating Denn the Orcatoothed is one of the requirements of the ![]() Book of Skywind I for the quest
Book of Skywind I for the quest ![]() Trials of the Braves, part of the Relic Weapons questline.
Trials of the Braves, part of the Relic Weapons questline.
Script[]
| Sastasha script | |
|---|---|
| Empty Room Only one of the following lines will appear, determined at random at the start of the duty. | |
| Bloody Memo | You find a bloodstained scrap of parchment with a message scrawled upon it in faded ink.
“The Capten lykes his sees Bloo.” |
| Bloody Memo | You find a bloodstained scrap of parchment with a message scrawled upon it in faded ink.
“The Capten lykes his wyne Redd.” |
| Bloody Memo | You find a bloodstained scrap of parchment with a message scrawled upon it in faded ink.
“The Capten lykes his cabege Green.” |
| The Cattery | |
| System | You find a switch. Press it? |
| System | You are doused with poison! |
| System | You hear something move in the distance. |
| System | You discover a switch, but it does not appear to function at this time... |
| System | A hidden door opens! |
| The Rambade | |
| Captain Madison (on engaging) |
How did ye find this place? |
| Madison's colibri (on engaging) |
Squawk! |
| Captain Madison (at 90%) |
Me loyal pups! |
| Captain Madison (at 80%) |
Come closer. I'll slit yer throat and toss yer corpse to the mad serpent. |
| Captain Madison (at 70%) |
Wh-Where are me men!? Wh-Where are me maidens!? |
| Captain Madison (at 50%) |
Try an' catch me, ye two-legged lubber! |
| Madison's colibri (at 50%) |
Two-legged lubber! Two-legged lubber! Squawk! |
| Dead Man's Drink | |
| Virgin Captive | You must save us! |
| System | The door is locked tight. |
| System | The shallowscale Reaver drops a captain's quarters key. |
| System | You obtain a captain's quarters key. |
| System | Unlock the door to the captain's quarters? |
| System | The Captain's Quarters opens. |
| Captain's Quarters | |
| Virgin Captive | What shall it be tonight, Cap─ You're not the captain! |
| Shallowtail Reaver (Overpower) |
Ain't no bastard gettin' by me! |
| System | The shallowtail Reaver drops a Waverider Gate key. |
| System | You obtain a Waverider Gate key. |
| The Hole | |
| System | The door is locked tight. |
| System | You obtain a key to the Hole. |
| System | Unlock the door to the Hole? |
| System | The Hole opens. |
| Virgin Captive | Forgive me, my lord! I did not mean to offend! |
| Virgin Captive | Am I...free? |
| Virgin Captive | Thank the Twelve! This nightmare is over! |
| Virgin Captive | I shan't bite any more... Just let me out! |
| Virgin Captive | Mother... Father... What did I do to deserve this? |
| Virgin Captive | I don't think I can last another night in the Deckhands' Quarters... |
| Virgin Captive | Please, milady/milord, I'm ever so sore... |
| Virgin Captive | Slit them between the legs! Every last one of them! |
| Deckhands' Quarters | |
| Roegadyn Shallowclaw Reaver | Get them gropers off me grog! |
| Hyur Shallowclaw Reaver | Sod off! I drink what I want. |
| Roegadyn Shallowclaw Reaver | I'll cut ye a new gob so's that ye can drink all grog ye like! |
| Hyur Shallowclaw Reaver | Not afore I cut ye a new piss'ole! |
| Waverider Gate | |
| System | The door is locked tight. |
| System | Unlock Waverider Gate? |
| System | Waverider Gate opens. |
| The Rambade | |
| Captain Madison (on engaging) |
Back fer more, eh? I sharpened me blade, just fer this very occasion. |
| Madison's colibri (on engaging) |
Squawk! |
| Captain Madison (Sandslinger) |
What do you see now? Nothin'! Nothin' at all! |
| Captain Madison (at 50%) |
Eat 'em alive! |
| System (at 50%) |
Captain Madison releases the scurvy dogs! |
| Captain Madison (at 20%) |
M-M-Might ye consider a parley? |
| Madison's colibri (at 20%) |
Parley! Parley! Parley! Squaaawk! |
| The Sultana's Lap | |
| Captain Madison | The boss ain't goin' to like this one bit... |
| Denn the Orcatoothed | Pshhh... You shully our shpawning groundsss, shorewalker! |
| Denn strikes down Madison before turning his attention to the party. | |
| Denn the Orcatoothed | Pshhh! Finleshhh fools! |
| Denn the Orcatoothed | The Lord of the Whorl shhhall sssup on your sssouls! |
| System (at 80%, 60%, and 40%) |
Bubbles begin forming on the water's surface. |
| System (disabling a ripple) |
The evil presence has gone. |
| System (if a baleen guard spawns) |
An enemy approaches! |
| Assorted dialogue | |
| Virgin Captive | I'm not one of them! I swear it on what little remains of my virtue! |
| Virgin Captive | Who are you? |
| Serpent Reavers | Die! |
| Serpent Reavers | Take the women alive! |
| Serpent Reavers | To the abyss with ye! |
| Madison's colibri | Cap'n is strong! Cap'n is strong! Squawk! |
| Madison's colibri | Batten down the hatches! Batten down the hatches! Squawk! |
| Madison's colibri | Scurvy dog! Scurvy dog! Squawk! |
Musical themes[]
"From the Depths" is the theme that plays in the background of Sastasha, and its orchestrion roll is a potential drop from Denn the Orcatoothed. Like many low-level dungeons, the theme that plays when fighting regular battles in Sastasha is "The Promise of Plunder", the theme for boss battles is "A Fine Death", and the final boss's battle theme is "Nemesis".
Notes[]
- ↑ Chance to drop for each individual party member that has completed the quest
 Triple Triad Trial.
- ↑ Cave Aureliae will use Numbing Tendrils only once upon dropping below 50% HP.
- ↑ Giant Clams will summon up to two rank 2 Shade Seekers any time they number less than four.
- ↑ A maximum of four rank 2 Shade Seekers can be found in a single group. Any Seekers in excess of four will instead be rank 1.
- ↑ Shallowclaw Reavers will only begin using Gutripper upon dropping below 50% HP. The Shallowclaw Reavers in the Deckhands' Quarters will not use Gutripper at all.
- ↑ Shalloweye Reavers will only begin using Raging Strikes upon dropping below 30% HP.
- ↑ The Shallowscale Reavers in the Deckhands' Quarters use Cure instead of Fast Blade, and will only use Cure on allies when they drop below 50% HP. They will not use Cure on themselves.
- ↑ The Shallowtail Reaver in the Captain's Quarters will begin using Overpower instead of Heavy Swing upon dropping below 70% HP.